Tutorials
0. Overview
Basic and navigation terms in program
01.
- "WEBSITES" tab - the place where you can add and manage forums and blogs.
- Website - in places where "website" is mentioned that information is the same for forums and blogs.
- Templates - used for creating new threads in forums or new posts in blogs.
- Template's sections - used for organizing templates. For example: Movies, Music, Pictures, etc.
- Topics - used for replying in topics.
- Topic's groups - use for organizing topics. For example: Movies, Music, Pictures, etc.
Where to start?
02.
- Add needed forums / blogs.
- In "WEBSITES" tab. In more details with screenshots chapter 2.1
- Add user for forums / blogs.
- In "WEBSITES" tab. In more details with screenshots chapter 2.2
- What do you want to do? Create or/and reply?
- To create new threads in forums or new posts in blogs you will need to use templates.
- First add needed template's sections in "CONFIG". In more details with screenshots chapter 4.1
- To reply to topics in forums you will need to use topics.
- First add needed topic's groups in "CONFIG". In more details with screenshots chapter 3.1
- Add templates or/and topics.
- Add templates for forums / blogs in "WEBSITES" tab. In more details with screenshots chapter 4.2
- Add topics for forums in "WEBSITES" tab. In more details with screenshots chapter 3.2
- Post to templates or/and topics.
- Post to templates in "TEMPLATES" tab. In more details with screenshots chapter 4.3
- Post to topics in "TOPICS" tab. In more details with screenshots chapter 3.3
What to see next?
03.
- Basic stuff chapters: 1.1, 1.2, 1.6, 1.7
- Message / post related chapters: 1.3, 1.4, 1.5
- Website prefixes, replacements, banned hosts, other settings chapters: 2.6, 2.4, 2.5, 2.3
- Posting from .txt files chapters: 3.4, 4.7
- Blogs (DLE, Wordpress, Blogger, Reddit) specific details chapters: 4.4, 4.5, 4.6, 4.8
- Posting status, errors, settings, problems related chapters: 5.x
- Saving posts to posts list related chapters: 6.1, 6.2, 6.5
- Schedule posts related chapters: 6.3, 6.4
- Take a look at "CONFIG" tab and be familiar with various settings.
- Most of the time the default settings work fine.
1. Basic stuff
Meaning of two rectangular indicators at the bottom
01.
At the bottom on the left you can see two rectangular shapes:

- The first one, means the number of error files in the folder.
- You can open the folder by simple clicking on it.
Usually you don't need to open the folder and see those files. What you usually do is double click on the failed status and it opens the file with error automatically in your browser.
More about those failed status errors in 5.2 - "About login and post errors" chapter. - The second shows number of success files in the folder. It's similar to errors files.
Tips on selecting your topics / templates / websites / groups and items from other lists
02.
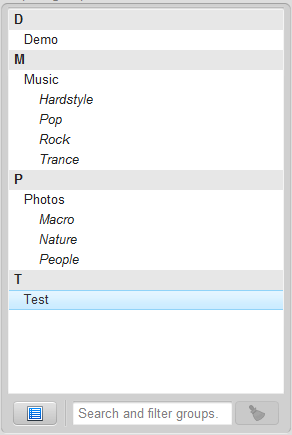
Topics / templates / websites / groups / etc. are displayed in the simple list.
To select a single item just click on the name.
There are few ways to select multiple items:
To select a single item just click on the name.
There are few ways to select multiple items:
- Hold down CTRL key and click on items you want to select.
- Hold down SHIFT key to select a range of items.
- Press on single item, then press CTRL+A to select all items.
- Use the "select all" button (bottom left in the screenshot) to select all items.
- Use special search and filter field at the bottom:

Just type the name or part of the name you want to filter and all items containing the searched string will be filtered.
In some lists you can also use it for filtering by specific website's type.
For example: type in 'phpBB' and all websites of type phpBB will be filtered from current list view. - There is special search and filter keyword "NOT". Must written at the start all uppercase. Will filter everything not containing words after it.
- There is special search and filter keyword "OR". For example: text1 OR text2.
- You can also enable in "Settings" -> "List search as selector" and then all filtered items will be automatically selected.
| List | You can filter by | Special filter terms |
|---|---|---|
| Groups | name | - |
| Sections | name | - |
| Categories | name | - |
| Topics | title, website name, website type, group | - |
| Templates | title, website name, website type, section | - |
| Websites | URL, name, type, category | with topics, without topics, with templates, without templates, with users, without users, enabled, disabled |
| Users | username, password | - |
| Prefixes | title, tag | - |
| Replacements | search string, replace with | - |
| Banned hosts | host | - |
| Flags | name, code (two characters code: http://en.wikipedia.org/wiki/ISO_3166-1_alpha-2) | enabled, disabled |
| Questions | question, answer | - |
| Templates editor | section name | without ids, with ids |
| Templates finder | website name, forum / category id | - |
About cover / description / tags / subscribe
03.
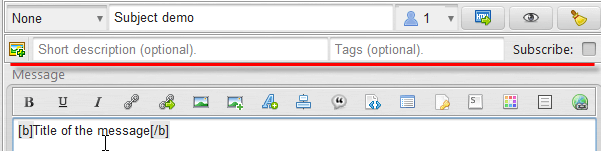
You can enter cover, description, tags or enable subscribe option in optional fields, which can be found above the main message field.
- Cover is only used by some websites. Those websites have a special field where you need to enter the cover URL. There is a setting in "CONFIG" -> "General posting" -> "Grab first image in message as cover", this will grab the first image in message as cover if enabled. I would suggest to enable it and don't worry about the cover since there aren't many websites who even use it.
- Description is a small description about your post. Some websites have it and other don't. It's always an optional field so you can enter it if you want and it will only for used for those websites who have it.
- Tags field is where you can enter your tags. Separate each tag by a comma. Tags are optional (some websites might not have this field), but they might improve the chance of people finding your post. There is a default limit of 5 tags for forum. You can change the limit if needed in "WEBSITES" -> "Other settings" tab.
- Subscribe option is in order to subscribe to your topic. When this option is enabled you will receive emails about new messages in your topic. There is also a setting in "CONFIG" -> "General posting" -> "Subscribe to all posts automatically". When that option is enabled you can ignore the subscribe option for each message since it will get subscribed automatically.
Surrounding host links with needed tags automatically.
04.
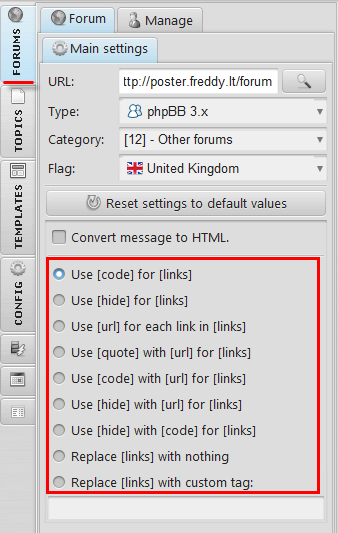
Some forums require to use [code] tag on your links, some [hide] and others allow to use [url] on every link.
To solve this problem the program has setup for each website what to surround links with. [code], [hide], [url], nothing, etc. depending on website settings.
You can choose these settings when adding / updating a website.
There is also an option to "Replace links with custom tag".
You can enter any custom tag, for example:
You can also enter multiple tags like this:
To solve this problem the program has setup for each website what to surround links with. [code], [hide], [url], nothing, etc. depending on website settings.
You can choose these settings when adding / updating a website.
There is also an option to "Replace links with custom tag".
You can enter any custom tag, for example:
spoiler
You can also enter multiple tags like this:
code|spoiler
Add needed file hosts in "CONFIG" -> "Hosts" -> which will be automatically surrounded with needed tag based on website settings.

The single links will be surrounded automatically when posting like this:
[needed_tag]
http://rapidshare.com/something/file.rar
[/needed_tag]
http://rapidshare.com/something/file.rar
[/needed_tag]
If you had multiple links (group of links) in the message then they will be surrounded like this:
[needed_tag]
http://rapidshare.com/something/file_part1.rar
http://rapidshare.com/something/file_part2.rar
http://rapidshare.com/something/file_part3.rar
http://rapidshare.com/something/file_part4.rar
http://rapidshare.com/something/file_part5.rar
[/needed_tag]
http://rapidshare.com/something/file_part1.rar
http://rapidshare.com/something/file_part2.rar
http://rapidshare.com/something/file_part3.rar
http://rapidshare.com/something/file_part4.rar
http://rapidshare.com/something/file_part5.rar
[/needed_tag]
In "CONFIG" -> "Hosts" -> you can also add image hosts which you use.
If some website requires to surround images with some tag you can setup it in "WEBSITES" -> select needed site -> "Other settings" -> "Surround images with tag" (don't forget to press "Update" button).
Basic message tips
05.
- Preview your formatted post before sending click on the eye button.

- Clear your old message by clicking the clear button (see the screenshot above).
- Save your message and subject by clicking the save button. Saved message and subject will be ready to use if you exit the program and start it later.

- You can also use message templates for saving some basic message structure. It's under "Message" menu, or use the shortcuts CTRL+M to save as message template and ALT+M to view and load message templates.
- Use ALT+X shortcut for quick message preview.
- Spintax is supported in message and subject. That means you can use this format {word1|word2|word3} and random word will be selected.
For example: {Writing|Creating} {articles|stories} is a {lot of fun|rewarding experience}. - You can use special tags in message:
- <forumName> - insert website name when posting.
- <postSubject> - insert subject when posting.
- Spell checker is supported (English only), but disabled by default due to more RAM (memory) usage. You can enable it if needed from "bin" folder, open file "config.properties" (in any text editor). Change the value for "SPELL_CHECKER" from "false" to "true".
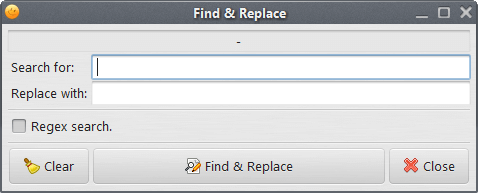
- Replace text window can be accessed via right click -> "Replace" or CTRL+H shortcut. You can pre-select some text which will be pre-filled in "Search for" field.
- Zoom (change font) of text area with shortcut "CTRL + mouse wheel".
- Open in browser - right click option on text fields / areas. Opens the selected text in browser. If selected text is or has URL - opens URL. If selected text doesn't have URL - opens Google search with that text. Selected text can have multiple URLs if needed (each URL will be opened). Can also have BBCode tags around URL(s), BBCode will be ignored.
- You can provide custom fields if really needed by format: <param=name=value>. For example: <param=topic_type=2>
- You can also provide custom fields with new lines or HTML tags if really needed by format: <param=name>value</param>. For example:
<param=comment>value with new
linesdemo</param>
Other tips
06.
A lot of elements in the program has a little tool-tip pop-up box with information.
All buttons with just an icon has it, also a lot of fields, table rows or cells and other things.
To view the message simply mouse over an element and don't move for 1 second.
Clean-up at least some of the statuses from "STATUS" tab, "ACTIVE" / "HISTORY" / "OTHER" / "PM" tables when they are not needed anymore. They do take some of the memory (RAM).
Some other features:
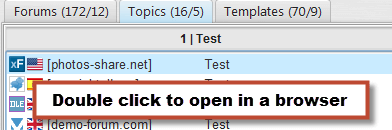
- Access your topics quickly by double clicking on the topic in the list (you can also double click on templates [browse section], websites [browser website], inside templates editor / finder [browse section]).
- Check websites to know exactly which websites are still alive.

- Register on website if you don't have an account on some website. Just choose a website and click register button. Your browser will open a website's register page.

- There are some useful options when you right click on the status table row:

- You can also right click on a lot of lists and other tables for some useful options which usually affects all selected items.
- The program has standard shortcuts F1 to open FAQ / Tutorials page and F2 to open the forum.
- You can view all keyboard shortcuts in "Help" menu -> "Shortcuts".
- Make sure to be familiar with general posting settings in "CONFIG" -> "General posting" tab. Not everything is mentioned in this FAQ because a lot of them are self explainable.
- Also check settings in "CONFIG" -> "Other" tab. There some useful options.
Dealing with captcha and random questions
07.
Captcha and random questions are supported.
By default they are displayed in "STATUS" -> "Q" tab:
You can use auto-captcha services which will solve them automatically and you won't need to enter manually.
You can set-up auto-captcha services in "CONFIG" -> "Captcha" tab:

Recommended services are:
If you choose not to use auto-captcha service you might want to enable in "CONFIG" -> "Captcha" -> "Automatically switch to 'Q' tab in status mode when captcha needs to be entered".
When entering answer to random question (manually or by Anti-Captcha) the program by default will ask you if you want to save that answer. This can be changed in "CONFIG" -> "Questions". The saved answer will be used automatically next time if website (forum / blog) has the same question (so you won't need to enter it any-more).
If using Anti-Captcha it's recommended not to change that option to "Always save". Sometimes answers from auto-captcha service might be incorrect if person who entered it misunderstood the question. You can also delete incorrect answers from database if saved by accident in "CONFIG" -> "Questions" -> "User".
By default they are displayed in "STATUS" -> "Q" tab:
You can use auto-captcha services which will solve them automatically and you won't need to enter manually.
You can set-up auto-captcha services in "CONFIG" -> "Captcha" tab:
Recommended services are:
- Anti-Captcha
- Uses real humans to solve the captchas (less errors - mostly none).
- Supports all types of captcha (including ReCaptcha and ReCaptcha 2).
- Supports random questions as well.
- Payment 0.7-2$ for 1000 of captchas / questions.
- You should set-up maximum bid in Anti-Captcha website. When there is a higher load the bid for captchas might get higher so if your maximum bid is very low Anti-Captcha won't have a person who could solve the captcha and you will see the captcha in program to enter manually.
- The lowest bid possible is always used, the maximum might only get used on higher load.
- You can check the [average] bid statistics in their website.
- 2Captcha
- Also great anti-captcha service. Works with all types of captcha.
- DeathByCaptcha
- Another good anti-captcha service. Works with all types of captcha.
- Captcha Sniper
- Solves captchas in software level (no real humans) so error rate can be higher.
- Does not support random questions.
- Does not support all types of captchas (does not support ReCaptcha at all).
- One time payment (77$ at the moment [with discount] when using the buy button from program you will get a discount or use this link: Info & Buy).
- Some types of captcha success rate is quite low (even quite popular) so you might see more errors when posting.
- Even if captcha is solved the answer might be incorrect so you will see error when posting (this is normal).
- Make sure to check Captcha Sniper documentation to run it correctly.
- When enabled in themaPoster you will see captcha "cudio" sent to Captcha Sniper if everything is fine. You can quickly disable and enable to make this test if needed.
- It's recommended to use Anti-Captcha service as a fail-over if Captcha Sniper is not able to solve the captcha at all.
If you choose not to use auto-captcha service you might want to enable in "CONFIG" -> "Captcha" -> "Automatically switch to 'Q' tab in status mode when captcha needs to be entered".
When entering answer to random question (manually or by Anti-Captcha) the program by default will ask you if you want to save that answer. This can be changed in "CONFIG" -> "Questions". The saved answer will be used automatically next time if website (forum / blog) has the same question (so you won't need to enter it any-more).
If using Anti-Captcha it's recommended not to change that option to "Always save". Sometimes answers from auto-captcha service might be incorrect if person who entered it misunderstood the question. You can also delete incorrect answers from database if saved by accident in "CONFIG" -> "Questions" -> "User".
License information
08.
There is menu under "Help" -> "License" where you can see the license information and copy the license key fast when needed.

At the bottom there is number (which means days the license is valid for) and two buttons: first one just opens the same "Help"->"License" window. Second - opens page in browser with extending information.

The number at the bottom becomes yellow when less than 10 days left until expiration date and red when less than 5 days left.
When less than 3 days you will see a small information message with reminder to extend.
At the bottom there is number (which means days the license is valid for) and two buttons: first one just opens the same "Help"->"License" window. Second - opens page in browser with extending information.
The number at the bottom becomes yellow when less than 10 days left until expiration date and red when less than 5 days left.
When less than 3 days you will see a small information message with reminder to extend.
2. Websites related
How to add new forum / blog?
01.
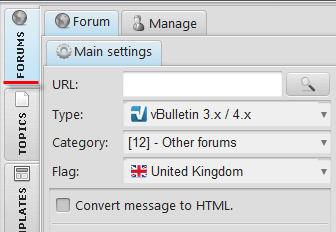
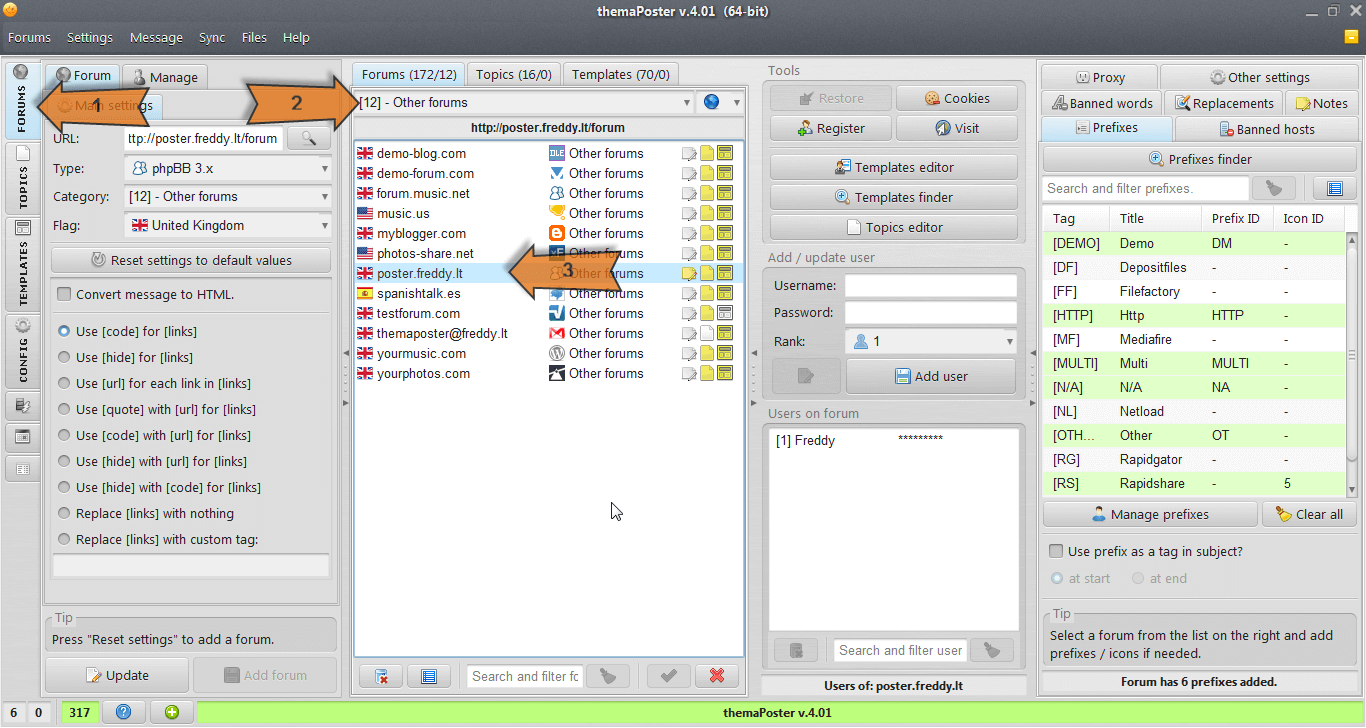
To add a new forum / blog click on the "WEBSITES" tab on the left.
Important: if you have any other website selected before adding a new website you should press "Reset settings to default values" (ALT+Z). That button does not affect selected website, it only clears the fields for new website to avoid using wrong settings from other website.
You can also import multiple websites at once from .txt file.
You can do this from "Websites" menu -> "Import websites from .txt file".
The .txt file should contain only URLs; one URL per line; must start with "http"
- Enter URL address.
- Make sure to use main URL. It might have /forum or something similar at the end.
- URL must be global (not to a specific file).
- For example: http://myforum.com or http://myforum.com/forum or http://forum.mysite.com and so on.
- Press "detect type" button (on left near URL).
- Program will automatically investigate the website to find it's type.
- You can as well click anywhere outside the field and the program will press the "detect type" button automatically.
- Note that the detected type is usually correct and you won't need to change it.
- Choose the category and change the default settings if needed.
- Press the "Add website" button to add the website.
-

-
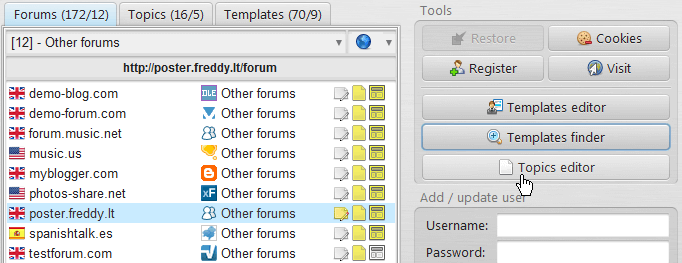
The website will appear on the right side in the websites list.
In the screenshot you can also see that there are total of 153 websites of which 12 are currently displayed in the list (not all are displayed because category "Other forums" is chosen).
Important: if you have any other website selected before adding a new website you should press "Reset settings to default values" (ALT+Z). That button does not affect selected website, it only clears the fields for new website to avoid using wrong settings from other website.
Add multiple websites at once
You can also import multiple websites at once from .txt file.
You can do this from "Websites" menu -> "Import websites from .txt file".
The .txt file should contain only URLs; one URL per line; must start with "http"
How to add users for a website?
02.
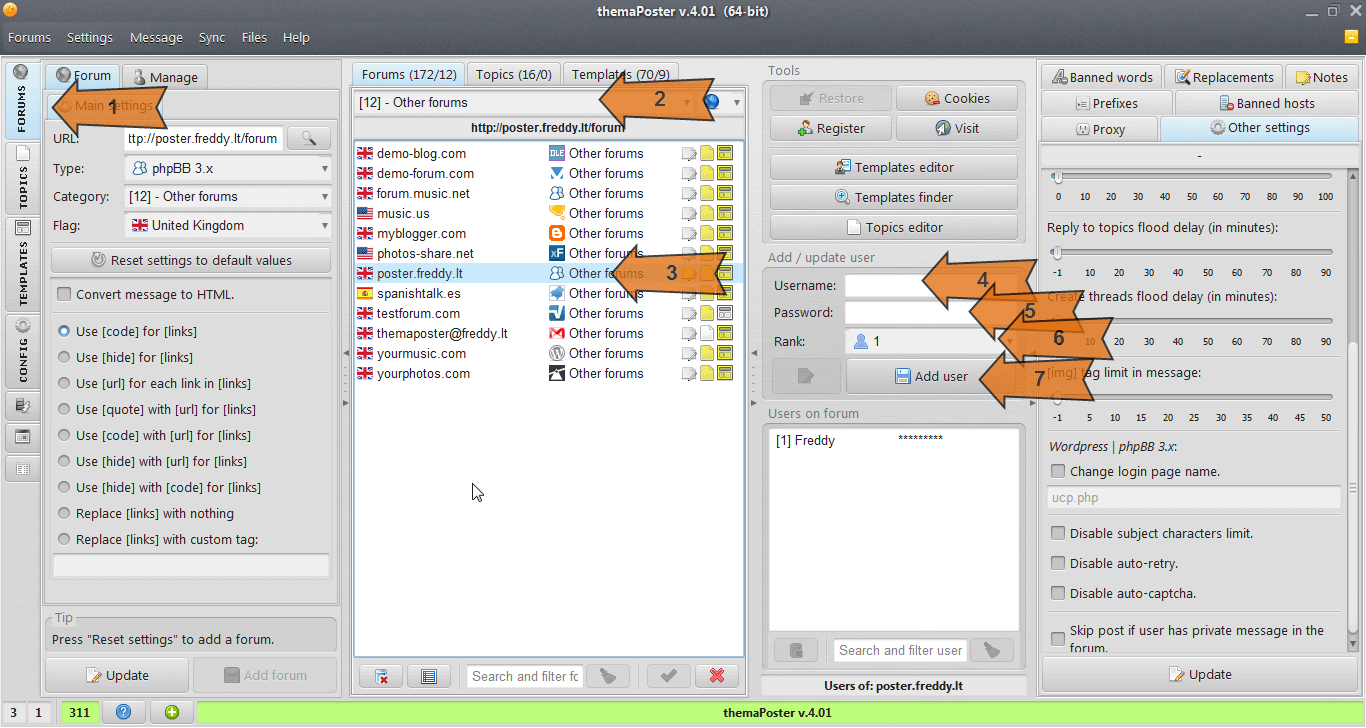
- To add a user to the website click on the "WEBSITES" tab on the left.
- Then select website's category if needed.
- Choose the website by clicking on it.
- Enter your username.
- Enter your password.
- Choose the rank of the user.
- The rank is needed in order to know with witch user you want to post later. This should only matter if you're using more than one user per website.
- Press "Add user" button.
About basic other website settings
03.
You can find more settings for specific website in the "WEBSITES" tab -> "Other settings" tab.


Here you can see "Cookies" with a minus sign. By pressing this button all website cookies will be removed. Cookies are only used by smart login, if you experiencing some "not logged in" errors when previously you were logged in, you might clear the cookies for that website. These errors are very rare and it usually never happens.
The "Restore" button is used to restore default configuration for built-in websites only. If you updated some settings for built-in website and later need to restore the default settings, then you should use this button.

Enable / disable buttons (on the right) are used to disable (and later enable) website. If website is disabled the program won't send any posts to it.
- You can select a default user rank to post with. When you posting you always need to select a rank of user, but if that rank does not exist in the website the default user rank will be used. Only useful when you have more than one user per website.
- Tags limit limits the tags which are posted to website. The default limit is 5.
- Daily post limit allows to set how many messages you want to send to a website per day (24 hours). After the daily post limit is reached the message will be delayed needed time to pass that 24h limit.
- You can override global flood delay settings (which is in "CONFIG" tab) if needed.
- You can disable subject characters limit if needed for specific website. The characters limit can be configured in "CONFIG" tab -> "General posting" section. Default characters limit is 100.
- Option to disable auto-retry will disable auto-retry for selected website. This will also disable smart login system, so if any website has some problems with cookies this option should be checked in order to solve them.
- Disable auto-captcha does what it says, simply will disable auto-captcha so if any website uses captcha a manual input will be shown.
- Convert message to HTML setting is used when you want to post all messages in HTML to specific website. Usually blogs (Wordpress / Blogger) allow only HTML then this option must be enabled. It will convert the normal message (including all BBCode tags) to HTML.
- The "Grab a single tag" option is used to grab a tag from the subject when posting. You should not mistaken this with "prefix tag", this has nothing to do with prefixes. Some websites has tags field (it is also in optional fields under "Message" menu). The main reason for this option is to use only one tag when posting, this might be useful because there are websites who will use all words from the subject as a tag, then you might get a lot of tags, let's say 5-6 and website allows only 3, so then error happens.
Didn't see much of those websites, just a few, but if you will get "too much tags entered" error in some website, this option might solve it.
Here you can see "Cookies" with a minus sign. By pressing this button all website cookies will be removed. Cookies are only used by smart login, if you experiencing some "not logged in" errors when previously you were logged in, you might clear the cookies for that website. These errors are very rare and it usually never happens.
The "Restore" button is used to restore default configuration for built-in websites only. If you updated some settings for built-in website and later need to restore the default settings, then you should use this button.
Enable / disable buttons (on the right) are used to disable (and later enable) website. If website is disabled the program won't send any posts to it.
Website replacements
04.
Website replacements are used to replace / remove some kind of wanted text from your message / subject when sending to only specific website.
Each website can have different replacements and they are applied to message / subject only when sending the specific website.
You can manage the replacements in "WEBSITES" tab. Just select a website and click on replacements section:
You can use the replacements for few various reasons. Let's take a look at the basic examples.
You can use replacements for various purposes and these are just some of them. The possibilities are endless.
There are also general replacements in "CONFIG" -> "Replacements" if you need some replacement for all posted messages (not website specific).
There are two types of replacements "Message" (applied to message text) or "Subject" (applied to subject).
Each website can have different replacements and they are applied to message / subject only when sending the specific website.
You can manage the replacements in "WEBSITES" tab. Just select a website and click on replacements section:
You can use the replacements for few various reasons. Let's take a look at the basic examples.
- If you use [center] tag and in some forums the [center] is not supported.
You can easily remove the [center] from the message when sending to those forums. -
You would only need to add these two replacements:
Search string: [center]
Replace with: (leave empty)
Search string: [/center]
Replace with: (leave empty) - If some forum doesn't support [center] tag, but they have something like [align=center] ... [/align].
You can easily replace the [center] tag for those websites with two replacements. -
Search string: [center]
Replace with: [align=center]
Search string: [/center]
Replace with: [/align] - Sometimes you need more advanced replacement. The regular expressions (regex) search is very handy in those situations. Regex is a very big topic and for more information and tutorials just search on Google.
-
Let's say you want to remove some text from your message when sending to some specific websites. You could create your own tag like [remove] text here [/remove] and then for websites where you want to remove everything inside (with those tags) you would need to add a replacement like this:
Search string: (?mis)\s?\[remove\].*?\[/remove\]\s*
Replace with: leave empty)
Mark the "regex search" checkbox.
And for all other websites where you want to post that text between the [remove] tags, add some simple replacements to just remove the tags like:
Search string: [remove]
Replace with: (leave empty)
Search string: [/remove]
Replace with: (leave empty) - You can also use it to remove a line with some word.
-
Search string: .*cat.*(\n)
Replace with: $1
Mark the "regex search" checkbox.
This would remove all lines from the message which contain a word "cat". - To add something at the start of the subject (add in "Subject" replacements tab):
-
Search string: .+
Replace with: YourText $0
Mark the "regex search" checkbox.
This will add "YourText" at the start of the subject.
Don't use it for prefixes. There is already settings in "WEBSITES" -> "Main settings", to use prefix tag in subject at start. - You could remove the [url] tags like this [url=http://something.com]text[/url] with replacement:
-
Search string: (?i)\[url=(.+?)\](.+?)\[/url\]
Replace with: $1
Mark the "regex search" checkbox.
All the [url=http://something.com]text[/url], would be replaced to just "http://something.com". - See the help topic of the replacements in the forum for more useful examples.
Some links about regular expressions suggested by "Wurstmu":
- http://docs.oracle.com/javase/7/docs/api/java/util/regex/Pattern.html - general information.
- http://www.regular-expressions.info/ - very good source for all implementations of regular expressions. It also explains the basic concepts (greedyness, back references) well.
- http://www.regexr.com/ - good training environment with short reference; it tests in real time and is also a real time saver if you want to develop and test more complex expressions. User regex library available to get inspired.
- https://regex101.com/ - another real-time testing / training site for various regex flavors. It has also a short reference and a user expressions library..
- http://regexone.com/ - interactive online learning course for regex - very good for a first contact with the topic.
You can use replacements for various purposes and these are just some of them. The possibilities are endless.
There are also general replacements in "CONFIG" -> "Replacements" if you need some replacement for all posted messages (not website specific).
There are two types of replacements "Message" (applied to message text) or "Subject" (applied to subject).
Website banned hosts
05.
Some website's does not allow to post various hosts. For each website you can add needed banned hosts. You should add only the hosts that you actualy use.
It can be any host (file host, image host, etc.). Enter only the host, for example: somehost.com. Don't enter www. or http://.
You can use BBCode as you always used, all BBCode will be clean-up after some banned host is removed. This is done automatically when posting.
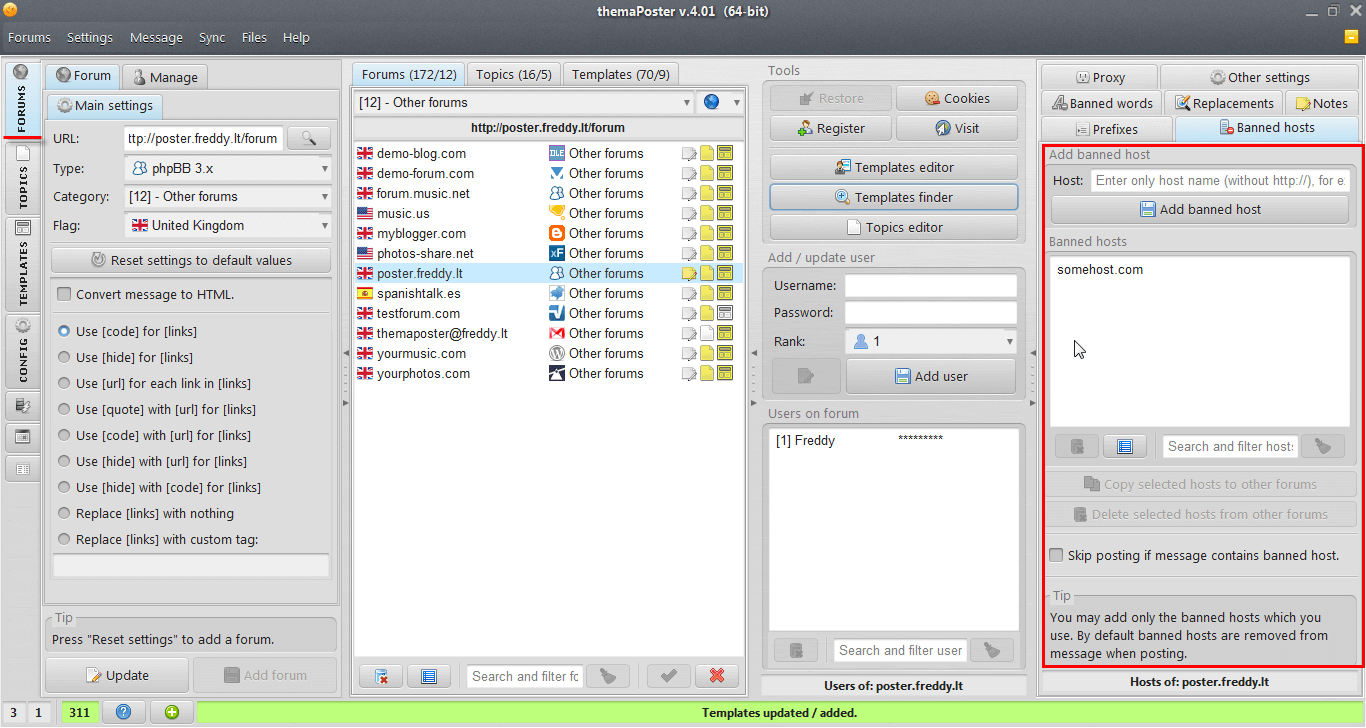
You can also skip the posting completely for that website if message contains banned host. Just enable in "WEBSITES" -> "Banned hosts" -> "Skip posting if message contains banned host".
It can be any host (file host, image host, etc.). Enter only the host, for example: somehost.com. Don't enter www. or http://.
You can use BBCode as you always used, all BBCode will be clean-up after some banned host is removed. This is done automatically when posting.
You can also skip the posting completely for that website if message contains banned host. Just enable in "WEBSITES" -> "Banned hosts" -> "Skip posting if message contains banned host".
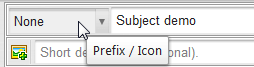
Website prefixes / icons
06.
The term "prefixes" in the program is used to describe both: thread prefix and icon.
You can select the prefix / icon when posting near the subject field.
When posting starts, program will try to use the prefix / icon which was chosen.

You can add your own prefixes in "CONFIG" -> "Prefixes" (like "Rapidshare", "Depositfiles", etc. which you will be able setup in "WEBSITES" settings).
To add or change the icon / prefix simply click on the field in the table and enter the new value.
To find prefix IDs use "Prefixes finder". It finds them automatically.
For some websites it might not work. In that case to find the prefix ID / icon ID you need to go to the website's "New Thread" page and open the html source. Search there where prefixes / icons are described. You should see something like this:
Prefixes:

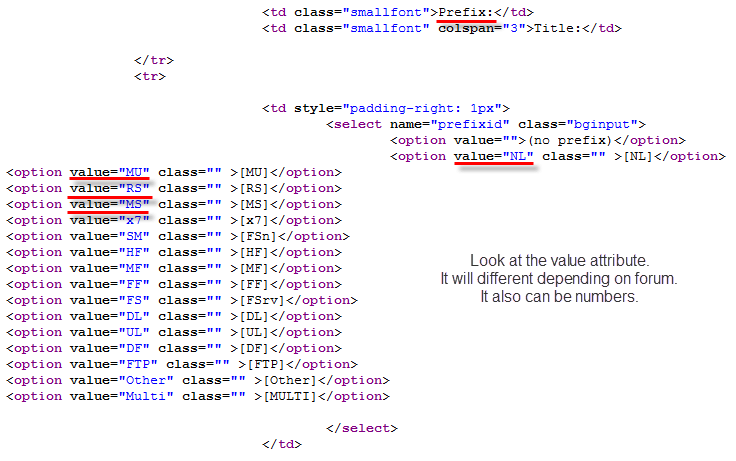
Icons:

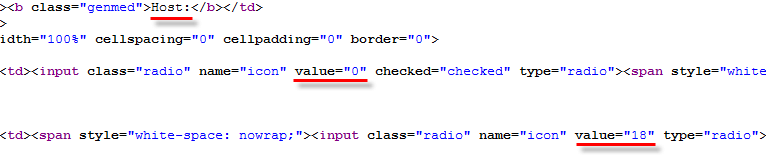
Depending on website it will be different. The prefix ID / icon ID is the value attribute.
Don't forget later to select your prefix when posting.
Also there is option when adding / updating website to use the prefix as a tag in subject (at start or at end). If this option is checked for some website the prefix code (short notation) will be added directly to the subject while posting.
For example: you choose a prefix of "Rapidshare". When posting starts the prefix code, in this case [RS], will be added at the start of your subject only to the forums which had the option 'Use prefix as a tag in the subject' -> 'At start' enabled.
You can select the prefix / icon when posting near the subject field.
When posting starts, program will try to use the prefix / icon which was chosen.
- If a website did not have that prefix specified it will try to use group / section prefix.
- If group / section didn't had any prefix or the website did not have that prefix specified, then it will try to use the "Other" prefix / icon.
- If that also isn't specified in prefixes setup then no prefix / icon will be used.
You can add your own prefixes in "CONFIG" -> "Prefixes" (like "Rapidshare", "Depositfiles", etc. which you will be able setup in "WEBSITES" settings).
To add or change the icon / prefix simply click on the field in the table and enter the new value.
To find prefix IDs use "Prefixes finder". It finds them automatically.
For some websites it might not work. In that case to find the prefix ID / icon ID you need to go to the website's "New Thread" page and open the html source. Search there where prefixes / icons are described. You should see something like this:
Prefixes:
Icons:
Depending on website it will be different. The prefix ID / icon ID is the value attribute.
Don't forget later to select your prefix when posting.
Also there is option when adding / updating website to use the prefix as a tag in subject (at start or at end). If this option is checked for some website the prefix code (short notation) will be added directly to the subject while posting.
For example: you choose a prefix of "Rapidshare". When posting starts the prefix code, in this case [RS], will be added at the start of your subject only to the forums which had the option 'Use prefix as a tag in the subject' -> 'At start' enabled.
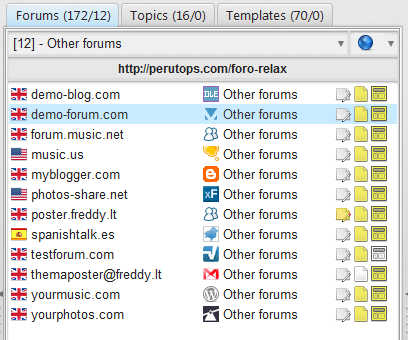
Website icons in program
07.
Next to the website you can see an icon which represents website type. Here is the meaning of all of them:

Also in forums list you can see three icons at the end:
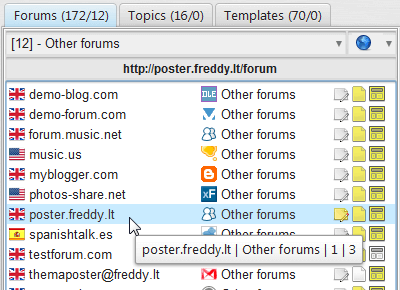
In the tooltip you can see two numbers at the end. First one indicates the total number of topics added for that website and the other the numbers of templates added.
Also in forums list you can see three icons at the end:
- Notes
- Topics
- Templates
In the tooltip you can see two numbers at the end. First one indicates the total number of topics added for that website and the other the numbers of templates added.
3. Topics and replying to topics related
Group your topics
01.
To add or update your groups go to "CONFIG" tab -> "Topic's groups".

You can think of a group like a folder. You can put your topics in a folder / group and when needed quickly access those topics.
To add a new group just write down wanted name and click "Add group" button. The new group will be immediately added to the groups and you will be able to select your group when adding new topics.
You can also create sub-groups by just selecting a "Parent" group. Moreover you can set flood delay (it will override the global setting from "CONFIG" tab). The default is -1 which means use the global delay setting.
To view your topics from a group or multiple groups go to "TOPICS" tab and simple select wanted groups on the left (use tips from 1.2 - "selecting your groups" chapter). The topics will be displayed on the right side in topics list.
To delete unwanted groups simple select groups you want to delete and press the delete button.
You can also quickly access the management of groups in "TOPICS" tab by pressing the button at the bottom "Manage groups".
How to add your topics?
02.
The topics can be added from the "WEBSITES" tab on the left.
You will need to select a forum and press on "Topics editor" button.

When a forum is a type of "IP Board" you'll see one additional field "Forum ID":

To find out a forum ID of your topic is really easy. Just press the "Reply" button in your topic and look in the URL address.
You should something like this:
http://forumUrl/index.php?act=post&do=reply_post&f=138&t=178927
http://forumUrl/index.php?app=forums&module=post§ion=post&do=reply_post&f=13&t=533078
The URL depends on "IP Board" version. There are two main versions. Just fill in with those numbers and you can add your topic.
The topic will appear on the right side in the topics list and you will be able to select your topic when posting.
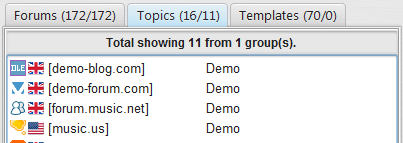
In the screenshot you can also see that there are total of 16 topics of which 5 being displayed.
Tip: you can select one topic in "TOPICS" tab and press the "+" button at the bottom right to open topics editor for selected topic's forum.

You will need to select a forum and press on "Topics editor" button.
- Give it a title.
- It can be anything you want, just for you to recognize this topic in the list when posting.
- Enter topic ID which you want to add.
- You can find the ID of topic at the topic URL address.
For example:
http://www.petchat.co.uk/beautiful-christmas-wallpapers-t6081.html
http://www.perved.com/showthread.php?t=1281752 - You can paste this kind of URL in the "Topic ID" field. It will parse the ID automatically.
- If you don't see the topic ID just click the "new reply" button. Then you most likely will able to see it in the URL.
- Choose a topic group.
- You must first add some groups if you don't have any (see 3.1 chapter).
- To manage your groups press on the "Manage groups" button at the bottom.
- Finally press the "Add topic" button.
To find out a forum ID of your topic is really easy. Just press the "Reply" button in your topic and look in the URL address.
You should something like this:
http://forumUrl/index.php?act=post&do=reply_post&f=138&t=178927
http://forumUrl/index.php?app=forums&module=post§ion=post&do=reply_post&f=13&t=533078
The URL depends on "IP Board" version. There are two main versions. Just fill in with those numbers and you can add your topic.
The topic will appear on the right side in the topics list and you will be able to select your topic when posting.
In the screenshot you can also see that there are total of 16 topics of which 5 being displayed.
Tip: you can select one topic in "TOPICS" tab and press the "+" button at the bottom right to open topics editor for selected topic's forum.
How to reply to your topic(s)?
03.
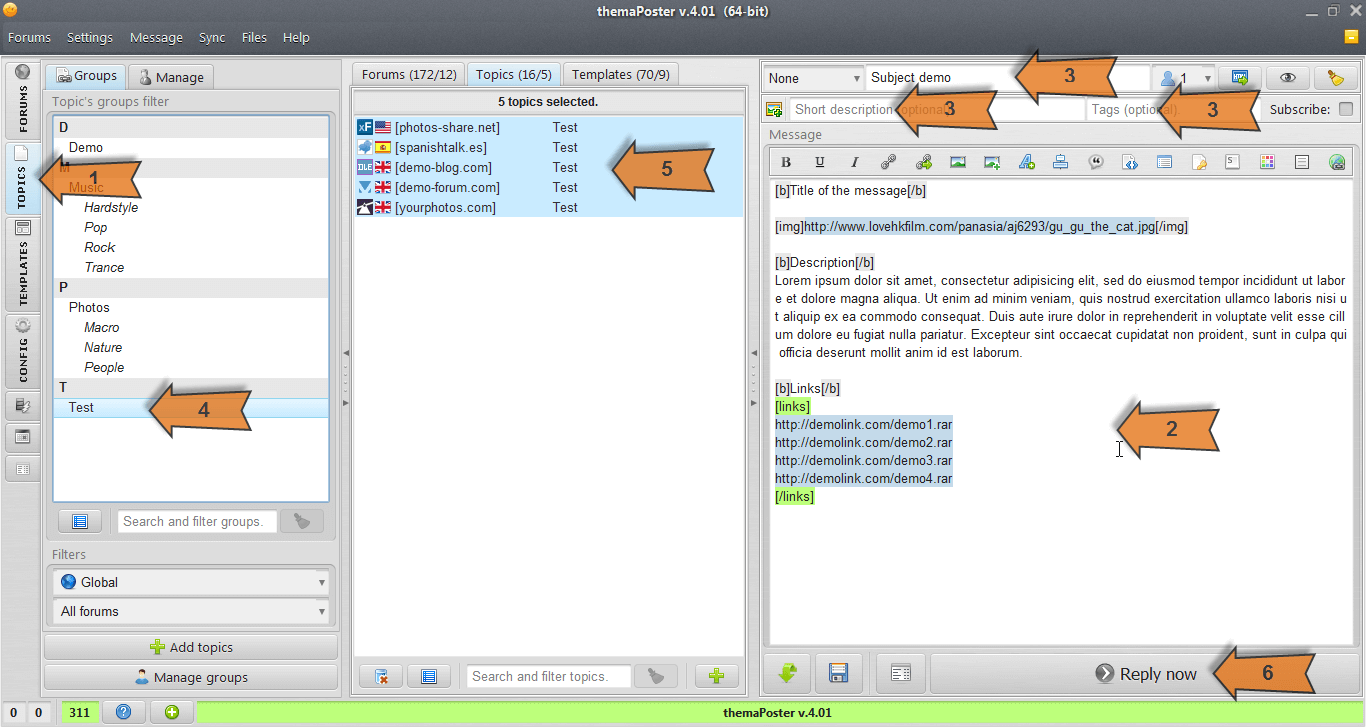
- Go to "TOPICS" tab.
- Write down your message in the center area.
- (optional) Write down a subject, description, tags if needed in the fields above.
- You can also select a user rank to post with. This is usually only needed if you have more than one user in a website and you want to post with second (etc.) user.
- Select wanted group(s) from the left side.
- Select wanted topics from the right topic's list (use tips from "selecting your topics" chapter 1.2)
- Press the "Reply now" button at the bottom.
- Your post then be submitted to all selected topics.
- The "Status mode" will be switched automatically for you to view the progress (can be disabled in "Settings" at the top).
- More about "Status mode" in the chapter 5.1.
About auto-reply from directory
04.
In user's folder there is a folder called "auto-reply". In that folder there are folders for each your topic group (these folders are being created automatically).
If you put a simple .txt file with a message in one of those folders the program will notice it automatically, will read the message and post it to all the topics who belongs to the group which folder is representing.
You can also specify a prefix in the file name like this:
{[FS]} Subject.txt
[FS] is the prefix tag name.
You can use special elements in your .txt message.
You can put these elements anywhere you want in your .txt file message. They will be completely removed when posting.
Note: program checks the folders automatically every 15 seconds.
Also please take a look at "CONFIG" -> "Directory posting" for some configuration. The default settings might work fine, but it's useful to know what you can configure.
If you put a simple .txt file with a message in one of those folders the program will notice it automatically, will read the message and post it to all the topics who belongs to the group which folder is representing.
You can also specify a prefix in the file name like this:
{[FS]} Subject.txt
[FS] is the prefix tag name.
You can use special elements in your .txt message.
| Element | Example | Description |
|---|---|---|
| <description> | <description>Your description here</description> | Provide the description. |
| <tags> | <tags>Tag1, Tag2, Tag3</tags> | Provide the tags. Usually comma separated. |
| <subscribe> | <subscribe>true</subscribe> | Subscribe to a post. |
| <user> | <user>2</user> | Specify wanted user rank. Default rank is 1 which is usually fine if you don't have multiple users per website. Rank number for the "random" is 10000 |
| <cover> | <cover>Url</cover> | Usually not needed, because option in "CONFIG" -> "General posting" -> "Grab first image as cover" is enabled by default and overall there are just few forums who use thread cover. |
| <useSubject> | <useSubject>false</useSubject> | Used when you don't want to use any subject when replying. I don't recommend to use this element, because subject gives better SEO for you post. There is also a setting in "CONFIG" -> "Directory posting" -> "Don't use subject when replying." |
| <subject> | <subject>Your subject</subject> | Specify subject if you don't want the program to grab it from file name or first line. |
| <prefix> | <prefix>[MULTI]</prefix> | Specify prefix. Tag name is used inside. |
| <postListTags> | <postListTags>PostTag1, PostTag2, PostTag3</postListTags> | Post list tags. The post tags must be added in the "Post list". |
| <schedule> | <schedule>2015-03-15 10:40:01</schedule> <schedule>+40min</schedule> |
For scheduling from .txt file. Supported dates format: click to expand.
dd-MM-yyyy yyyy-MM-dd MM/dd/yyyy yyyy/MM/dd dd MMM yyyy dd MMMM yyyy yyyyMMddHHmm yyyyMMdd HHmm dd-MM-yyyy HH:mm yyyy-MM-dd HH:mm MM/dd/yyyy HH:mm yyyy/MM/dd HH:mm dd MMM yyyy HH:mm dd MMMM yyyy HH:mm yyyyMMddHHmmss yyyyMMdd HHmmss dd-MM-yyyy HH:mm:ss yyyy-MM-dd HH:mm:ss MM/dd/yyyy HH:mm:ss yyyy/MM/dd HH:mm:ss dd MMM yyyy HH:mm:ss dd MMMM yyyy HH:mm:ss |
You can put these elements anywhere you want in your .txt file message. They will be completely removed when posting.
Note: program checks the folders automatically every 15 seconds.
Also please take a look at "CONFIG" -> "Directory posting" for some configuration. The default settings might work fine, but it's useful to know what you can configure.
4. Threads and creating new threads related
Manage your sections
01.
To add or update your sections go to "CONFIG" tab -> "Template's sections".
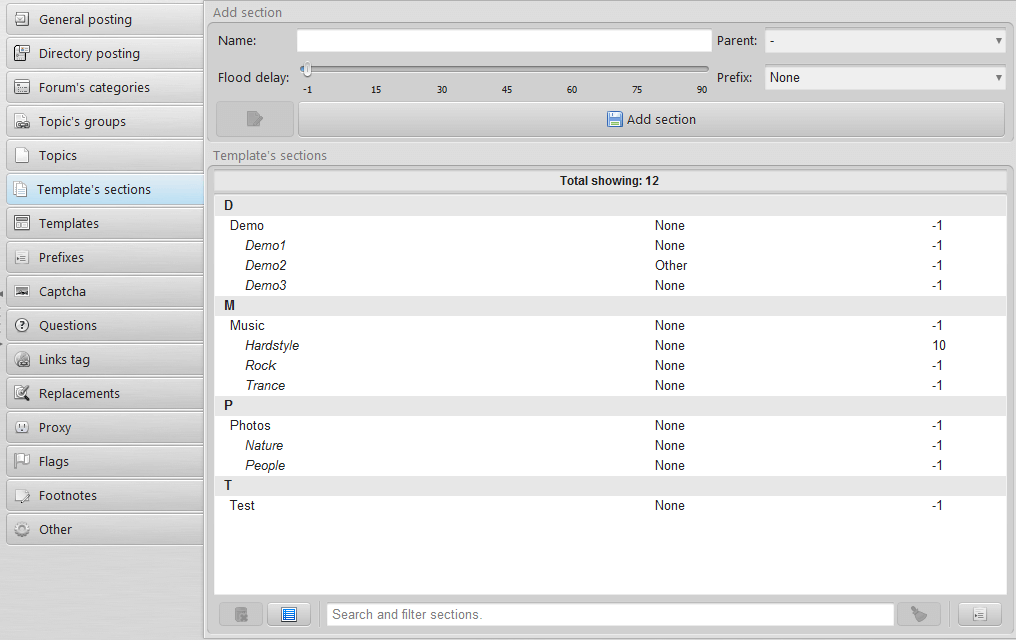
You can think of a section like a sub-forum in a forum. You can have a lot of templates (from different forums) added to a section where you want to create new threads.
To add a new section just write down wanted name and click "Add section" button. The new section will be immediately added to the sections and you will be able to select your sections when adding new templates.
You can also create sub-sections by just selecting a "Parent" section. Moreover you can set flood delay (it will override the global setting from "CONFIG" tab). The default is -1 which means use the global delay setting.
To view your templates from a section or multiple sections go to "TEMPLATES" tab and simple select wanted sections on the left (use tips from 1.2 - "selecting your sections" chapter). The templates will be displayed on the right side in templates list.
To delete unwanted sections simple select sections you want to delete and press the delete button.
You can also quickly access the management of sections in "TEMPLATES" tab, in templates finder and editor by pressing the button at the bottom "Manage sections".
How to add templates to sections (sub-forums)?
02.
A template is basically a sub-forum / category in the forum / blog to which you would like to create new threads.
Before you can add templates you must setup some sections as described in 4.1 chapter.
To add a new template:
Website name and forum / category ID are automatically found from the website.
You only need to select a section of wanted sub-forum and the template with selected section and forum / category ID will be added / updated after you press the save button.
You can edit forum / category ID values by just clicking on wanted row and enter the value.
You can find the ID of forum at the forum URL address.
For example:
http://www.petchat.co.uk/wallpapers-f18.html
http://www.perved.com/showthread.php?f=101
If you don't see the forum ID just click the "new thread" button. Then you most likely will able to see it.
After you done press the "Update" button. All templates will be added automatically.
The templates will appear in the templates list and you will be able to select your templates when posting.
Before you can add templates you must setup some sections as described in 4.1 chapter.
To add a new template:
- Click on the "WEBSITES" tab.
- Choose wanted category.
- Select a website.
- You can use templates finder to find the sub-forums automatically or you can use templates editor to enter the IDs yourself.
- Mostly you should use templates finder.
- Templates editor also shows quickly all the templates you have in the website.
- Sometimes templates finder won't work, then you must use templates editor to add the templates.
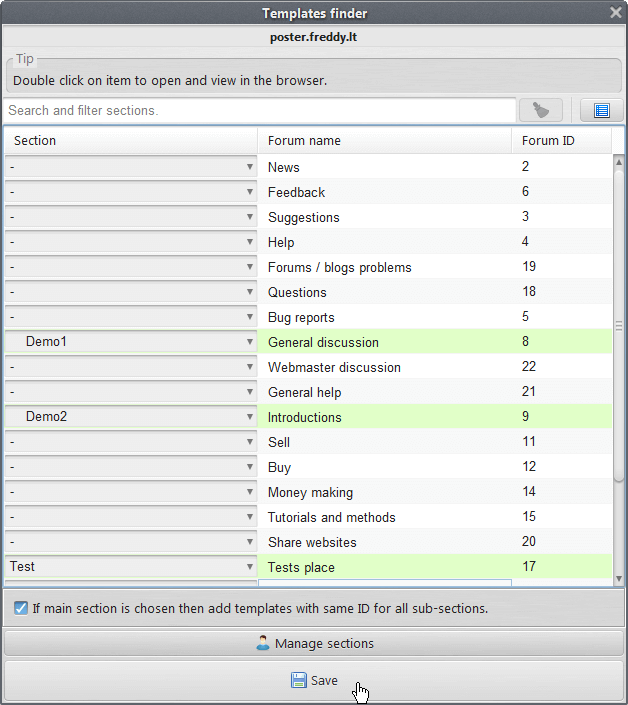
Using templates finder
Press on "Templates finder" button. You will see this window:Website name and forum / category ID are automatically found from the website.
You only need to select a section of wanted sub-forum and the template with selected section and forum / category ID will be added / updated after you press the save button.
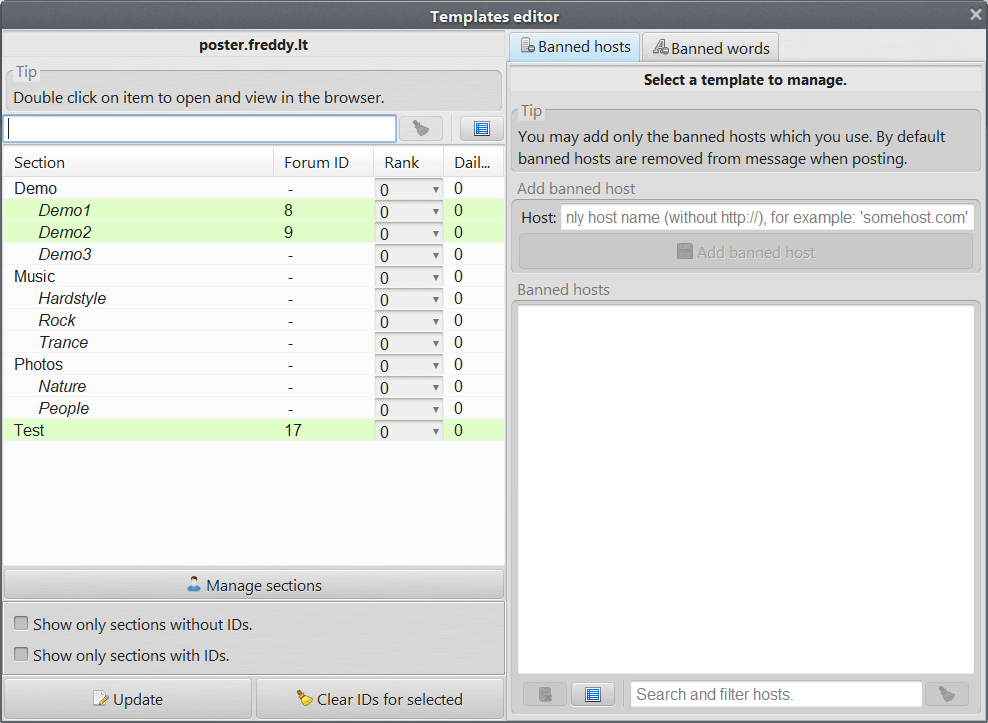
Using templates editor
Press on "Templates editor" button. You will see this window:You can edit forum / category ID values by just clicking on wanted row and enter the value.
You can find the ID of forum at the forum URL address.
For example:
http://www.petchat.co.uk/wallpapers-f18.html
http://www.perved.com/showthread.php?f=101
If you don't see the forum ID just click the "new thread" button. Then you most likely will able to see it.
After you done press the "Update" button. All templates will be added automatically.
The templates will appear in the templates list and you will be able to select your templates when posting.
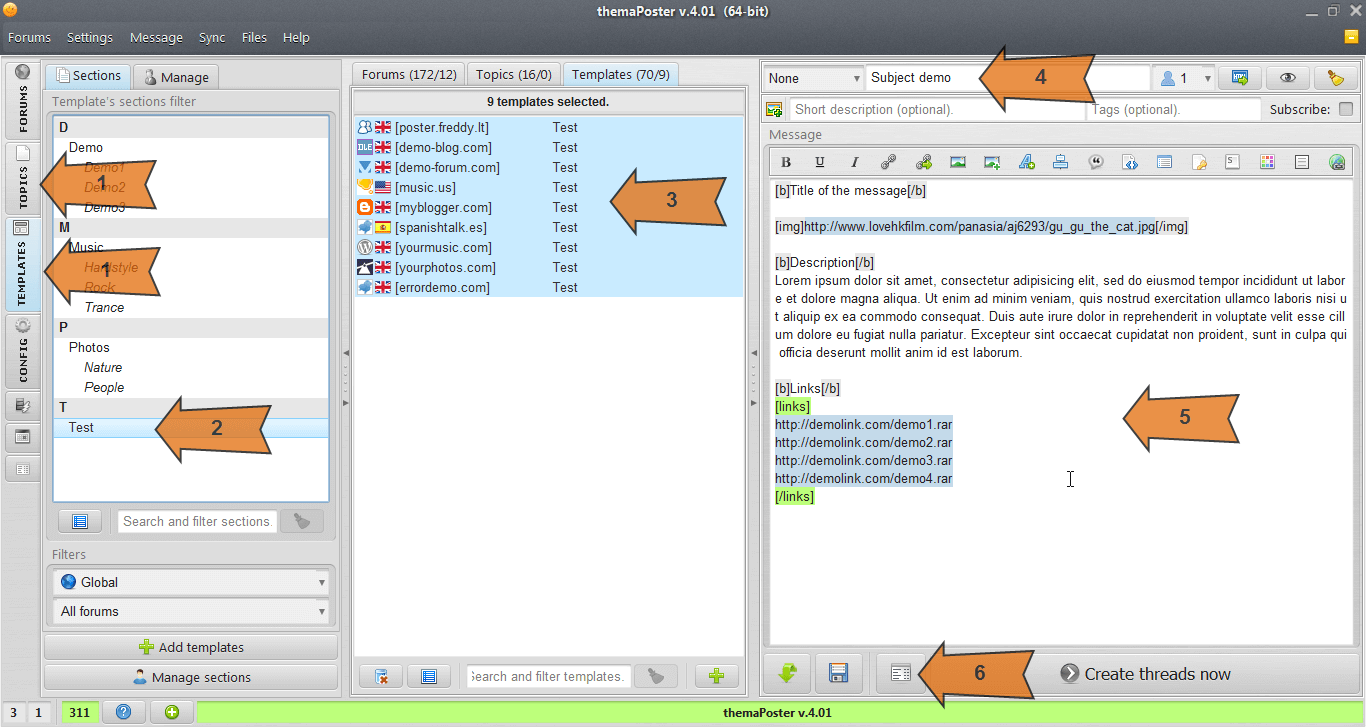
How to create new thread(s)?
03.

- Go to "TEMPLATES" tab.
- Write down your message in the center area.
- (optional) Write down a subject, description, tags if needed in the fields above.
- Also you can select a user rank to post with. This is usually only needed if you have more than one user in a website and you want to post with second (etc.) user.
- Select wanted section(s) from the left side.
- Select wanted templates from the right template's list (use tips from "selecting your templates" chapter 1.2).
- Press the "Create threads now" button at the bottom.
- Your post then be submitted to all selected templates.
- The "Status mode" will be switched automatically for you to view the progress (can be disabled in "Settings" at the top).
- More about "Status mode" in the chapter 5.1.
How to add news to DLE blog?
04.
Adding news to DLE blog is actually almost the same as creating new threads in forum.
You should be familiar with that, if not check chapters: 4.1, 4.2, 4.3
You will need to add the blog in "WEBSITES" tab, and add your user to it.
After that you will just need to add needed templates to categories of the blog. The easiest way is to use "templates finder" as described in "4.2 - How to add templates to sections (sub-forums)?".
If for some reason "templates finder" is not able to find templates you can do it manually (expand to read more).
Open "add news" page. It should look something like this:

To get categories ids you will need to open html source.
After that find the part where those categories are written, it will look similar to this:

You can see from this part that "TV shows" category ID is 6.
Also you probably noticed that DLE blog has "short news" and "full news" fields. That's were you might want to use the "DLE message separator" which can be changed in "CONFIG" tab inside the program.
DLE message separator tells where short news ends. If separator is not used than short news and full news will be the same. The default separator looks like this "==========".
For example your message with the separator looks like this:
Then the short news would be only the part before the separator:
And the full news would be everything like this:
Also there is an option in "WEBSITES" tab, "Other settings" section to use separator as splitter for DLE.
This will split the message into two parts and use everything what is above the separator for "short news" and everything what is below for "long news". In other words, the "short news" will not be repeated in "long news".
The separator can be inserted to message with replacements if needed. For information about replacements check chapter 2.4.
Note: the separator is replaced with nothing for all other 'forum' types.
Some DLE blogs require to post via admin panel, you will need to enable this option in "WEBSITES" -> "Other settings" tab. The default admin-cp page name is "admin.php", some DLE blogs might have changed that so you will also need to change it then. You should see the name of the page in the URL when accessing admin panel.
You should be familiar with that, if not check chapters: 4.1, 4.2, 4.3
You will need to add the blog in "WEBSITES" tab, and add your user to it.
After that you will just need to add needed templates to categories of the blog. The easiest way is to use "templates finder" as described in "4.2 - How to add templates to sections (sub-forums)?".
If for some reason "templates finder" is not able to find templates you can do it manually (expand to read more).
Open "add news" page. It should look something like this:
To get categories ids you will need to open html source.
After that find the part where those categories are written, it will look similar to this:
You can see from this part that "TV shows" category ID is 6.
Also you probably noticed that DLE blog has "short news" and "full news" fields. That's were you might want to use the "DLE message separator" which can be changed in "CONFIG" tab inside the program.
DLE message separator tells where short news ends. If separator is not used than short news and full news will be the same. The default separator looks like this "==========".
For example your message with the separator looks like this:
TV show episode title
[img]http://linkToImage.com/image1.jpg[img]
Small details
==========
Full description
Download links...
[img]http://linkToImage.com/image1.jpg[img]
Small details
==========
Full description
Download links...
Then the short news would be only the part before the separator:
TV show episode title
[img]http://linkToImage.com/image1.jpg[img]
Small details
[img]http://linkToImage.com/image1.jpg[img]
Small details
And the full news would be everything like this:
TV show episode title
[img]http://linkToImage.com/image1.jpg[img]
Small details
Full description
Download links...
[img]http://linkToImage.com/image1.jpg[img]
Small details
Full description
Download links...
Also there is an option in "WEBSITES" tab, "Other settings" section to use separator as splitter for DLE.
This will split the message into two parts and use everything what is above the separator for "short news" and everything what is below for "long news". In other words, the "short news" will not be repeated in "long news".
The separator can be inserted to message with replacements if needed. For information about replacements check chapter 2.4.
Note: the separator is replaced with nothing for all other 'forum' types.
Some DLE blogs require to post via admin panel, you will need to enable this option in "WEBSITES" -> "Other settings" tab. The default admin-cp page name is "admin.php", some DLE blogs might have changed that so you will also need to change it then. You should see the name of the page in the URL when accessing admin panel.
How to add posts to Wordpress blog?
05.
Adding news to Wordpress blog is actually almost the same as creating new threads in forum.
You should be familiar with that, if not check chapters: 4.1, 4.2, 4.3
You will need to add the blog in "WEBSITES" tab, and add your user to it.
After that you will just need to add needed templates to categories of the blog. The easiest way is to use "templates finder" as described in "4.2 - How to add templates to sections (sub-forums)?".
If for some reason "templates finder" is not able to find templates you can do it manually (expand to read more).
Open "new post" page. It should look something like this:

To get categories ids you will need to open html source.
After that find the part where those categories are written, it will look similar to this:

You can see from this part that "Game" category ID is 1 and "Movies" category ID is 3.
Messages in Wordpress usually needs to be posted in HTML format. To do that enable setting in "WEBSITES" -> select the blog -> in "Main settings" tab -> "Convert message to HTML" -> Press "Update" button. When this setting is enabled the message (and all BBCode) will be automatically converted to HTML when posting.
If you want to use the Wordpress "<!--more-->" tag, then just simply use "Blog message separator" which can be change in "CONFIG" tab inside the program. It will be automatically replaced to "<!--more-->". The default separator looks like this "==========".
The separator can be inserted to message with replacements if needed. For information about replacements check chapter 2.4.
Note: the separator is replaced with nothing for all other 'forum' types.
You should be familiar with that, if not check chapters: 4.1, 4.2, 4.3
You will need to add the blog in "WEBSITES" tab, and add your user to it.
After that you will just need to add needed templates to categories of the blog. The easiest way is to use "templates finder" as described in "4.2 - How to add templates to sections (sub-forums)?".
If for some reason "templates finder" is not able to find templates you can do it manually (expand to read more).
Open "new post" page. It should look something like this:
To get categories ids you will need to open html source.
After that find the part where those categories are written, it will look similar to this:
You can see from this part that "Game" category ID is 1 and "Movies" category ID is 3.
Messages in Wordpress usually needs to be posted in HTML format. To do that enable setting in "WEBSITES" -> select the blog -> in "Main settings" tab -> "Convert message to HTML" -> Press "Update" button. When this setting is enabled the message (and all BBCode) will be automatically converted to HTML when posting.
If you want to use the Wordpress "<!--more-->" tag, then just simply use "Blog message separator" which can be change in "CONFIG" tab inside the program. It will be automatically replaced to "<!--more-->". The default separator looks like this "==========".
The separator can be inserted to message with replacements if needed. For information about replacements check chapter 2.4.
Note: the separator is replaced with nothing for all other 'forum' types.
How to add posts to Blogger (blogspot)?
06.
Adding posts to Blogger is actually almost the same as creating new threads in forum.
You should be fammiliar with that, if not check chapters: 4.1, 4.2, 4.3
You will need to add the blog in "WEBSITES" tab and your add user to it.
After that you will just need to add one template. Since Blogger doesn't have any sub-forums or categories there are no "IDs".
Add one template to the blog in wanted section with any ID you want (it could be 123).
When adding username add your Google account (or gmail's username). The main username you use to post in the blog. When adding gmail's username the "@gmail.com" part at the end is not required. It will work fine with and without it.
When posting enter labels in the tags field if needed.
Messages in Blogger usually needs to be posted in HTML format. To do that enable setting in "WEBSITES" -> select the blog -> in "Main settings" tab -> "Convert message to HTML" -> Press "Update" button. When this setting is enabled the message (and all BBCode) will be automatically converted to HTML when posting.
If you want to use the Blogger "<!--more-->" tag, then just simply use "Blog message separator" which can be change in "CONGIG" tab -> "General posting" section inside the program. It will be automatically replaced to "<!--more-->". The default separator looks like this "==========".
The separator can be inserted to message with replacements if needed. For information about replacements check chapter 2.4.
Note: the separator is replaced with nothing for all other 'forum' types.
About auto-create from directory
07.
In user's folder there is a folder called "auto-create". In that folder there are folders for each section (these folders are being created automatically).
If you put a simple .txt file with a message in one of those folders the program will notice it automatically, will read the message and create threads to all the templates who belongs to the section which folder is representing.
You can also specify a prefix in the file name like this:
{[FS]} Subject.txt
[FS] is the prefix tag name.
You can use special elements in your .txt message.
You can put these elements anywhere you want in your .txt file message. They will be completely removed when posting.
Note: program checks the folders automatically every 15 seconds.
Also please take a look at "CONFIG" -> "Directory posting" for some configuration. The default settings might work fine, but it's useful to know what you can configure.
If you put a simple .txt file with a message in one of those folders the program will notice it automatically, will read the message and create threads to all the templates who belongs to the section which folder is representing.
You can also specify a prefix in the file name like this:
{[FS]} Subject.txt
[FS] is the prefix tag name.
You can use special elements in your .txt message.
| Element | Example | Description |
|---|---|---|
| <description> | <description>Your description here</description> | Provide the description. |
| <tags> | <tags>Tag1, Tag2, Tag3</tags> | Provide the tags. Usually comma separated. |
| <subscribe> | <subscribe>true</subscribe> | Subscribe to a post. |
| <user> | <user>2</user> | Specify wanted user rank. Default rank is 1 which is usually fine if you don't have multiple users per website. Rank number for the "random" is 10000 |
| <cover> | <cover>Url</cover> | Usually not needed, because option in "CONFIG" -> "General posting" -> "Grab first image as cover" is enabled by default and overall there are just few websites who use thread cover. |
| <subject> | <subject>Your subject</subject> | Specify subject if you don't want the program to grab it from file name or first line. |
| <prefix> | <prefix>[MULTI]</prefix> | Specify prefix. Tag name is used inside. |
| <postListTags> | <postListTags>PostTag1, PostTag2, PostTag3</postListTags> | Post list tags. The post tags must be added in the "Post list". |
| <schedule> | <schedule>2015-03-15 10:40:01</schedule> <schedule>+40min</schedule> |
For scheduling from .txt file. Supported dates format: click to expand.
dd-MM-yyyy yyyy-MM-dd MM/dd/yyyy yyyy/MM/dd dd MMM yyyy dd MMMM yyyy yyyyMMddHHmm yyyyMMdd HHmm dd-MM-yyyy HH:mm yyyy-MM-dd HH:mm MM/dd/yyyy HH:mm yyyy/MM/dd HH:mm dd MMM yyyy HH:mm dd MMMM yyyy HH:mm yyyyMMddHHmmss yyyyMMdd HHmmss dd-MM-yyyy HH:mm:ss yyyy-MM-dd HH:mm:ss MM/dd/yyyy HH:mm:ss yyyy/MM/dd HH:mm:ss dd MMM yyyy HH:mm:ss dd MMMM yyyy HH:mm:ss |
| <categories> | <categories>Section 2, Section 3</categories> | Specify additional categories for Wordpress or DLE blog. Section names must be exactly as added in the program. Only should be used when want to post one message to multiple categories. You don't need to provide the category which you already posting to, only additional categories. |
You can put these elements anywhere you want in your .txt file message. They will be completely removed when posting.
Note: program checks the folders automatically every 15 seconds.
Also please take a look at "CONFIG" -> "Directory posting" for some configuration. The default settings might work fine, but it's useful to know what you can configure.
How to add posts to Reddit?
08.
Adding posts to Reddit is actually almost the same as creating new threads in forum.
You should be fammiliar with that, if not check chapters: 4.1, 4.2, 4.3
You will need to add the Reddit website in "WEBSITES" tab and your add user to it.
To mark the post nsfw or spoiler enter nsfw and/or spoiler in tags or description when posting.
You should be fammiliar with that, if not check chapters: 4.1, 4.2, 4.3
You will need to add the Reddit website in "WEBSITES" tab and your add user to it.
- Templates - used for posting posts to sub-reddits and profile pages. Use "Templates editor" to add templates.
- For sub-reddits - ID name is sub-reddit's name (without /r). For example: https://www.reddit.com/r/google/ , ID name is: google
- For profile pages - ID name is u_USERNAME. For example: https://www.reddit.com/user/Freddy0o0 , ID name is: u_Freddy0o0
- Topics - used for posting comments. Use "Topics editor" to add topics.
-
- For topic ID you can just enter URL of the post you want to comment. It will automatically find the topic ID. For example: https://www.reddit.com/r/google/comments/ckn0mk/monthly_discussion_and_support_thread_august_2019/
To mark the post nsfw or spoiler enter nsfw and/or spoiler in tags or description when posting.
How to add posts to downloadsindex.com?
09.
Adding posts to Downloads Index is actually almost the same as creating new threads in forum.
You should be fammiliar with that, if not check chapters: 4.1, 4.2, 4.3
You must use https://downloadsindex.com from build-in websites.
If you don't have build-in websites, you can buy them here: buy page.
To post you will need to do this:
You should be fammiliar with that, if not check chapters: 4.1, 4.2, 4.3
You must use https://downloadsindex.com from build-in websites.
If you don't have build-in websites, you can buy them here: buy page.
To post you will need to do this:
- Add random user to the website (username and password does not matter, it's not being used).
- Add random template to needed section (ID does not matter, can be 123).
- Submit your post to that template and it will be posted to Downloads Index.
- Your post must pass through rules filter: Downloads Index rules.
5. Posting related
About status mode
01.
The status mode shows progress of communication with the websites. It might look something like this:

There are 4 main columns:
You will see error messages if any occurred or a successful message on success.
Double click on response message to open an error / success file (or show your post) in a browser.
More about error messages in the next chapter.
There are 4 main columns:
- Website - the name of website.
- Http status - the http status returned.expand to read more.
If you know something about the web, http status should be already familiar.
There are a few most popular statuses that you might see returned:- 200 - The request has succeeded. Some meaningful html page returned as response.
- 302 - Redirection happened.
- 403 - Forbidden.
- 404 - Page not found.
The website on successful request will return 200 or 302.
If you see a 200 code and an error message, that probably means that website returned a page containing the error message which you can see in the errors folder. Some websites redirects on successful login and that gives http code of 302.
- Message - information message about the status.
- Status - percentage representation of progression. Starts at 0% ends at 100%.
You will see error messages if any occurred or a successful message on success.
Double click on response message to open an error / success file (or show your post) in a browser.
More about error messages in the next chapter.
About login and post errors
02.
When you start post or to add topic, a login or post error may occur.
These errors always generate an error file.
You can open your error files folder by clicking on first rectangular at the bottom left or from menu bar.
Usually you don't need to view that folder, you can easily open specific error file by just double clicking on the status in the status table with an error.
A login / post error file is a simple html file, the response of the website.
You can open it with your browser and see the error message of the website.
It might look something like these examples:


The last error about subject is quite rear, most of the websites does not require the subject, just some require the subject field not to be empty.
Overall errors may vary a lot and they depend on specific website.
These errors always generate an error file.
You can open your error files folder by clicking on first rectangular at the bottom left or from menu bar.
Usually you don't need to view that folder, you can easily open specific error file by just double clicking on the status in the status table with an error.
A login / post error file is a simple html file, the response of the website.
You can open it with your browser and see the error message of the website.
It might look something like these examples:
The last error about subject is quite rear, most of the websites does not require the subject, just some require the subject field not to be empty.
Overall errors may vary a lot and they depend on specific website.
Basic settings
03.
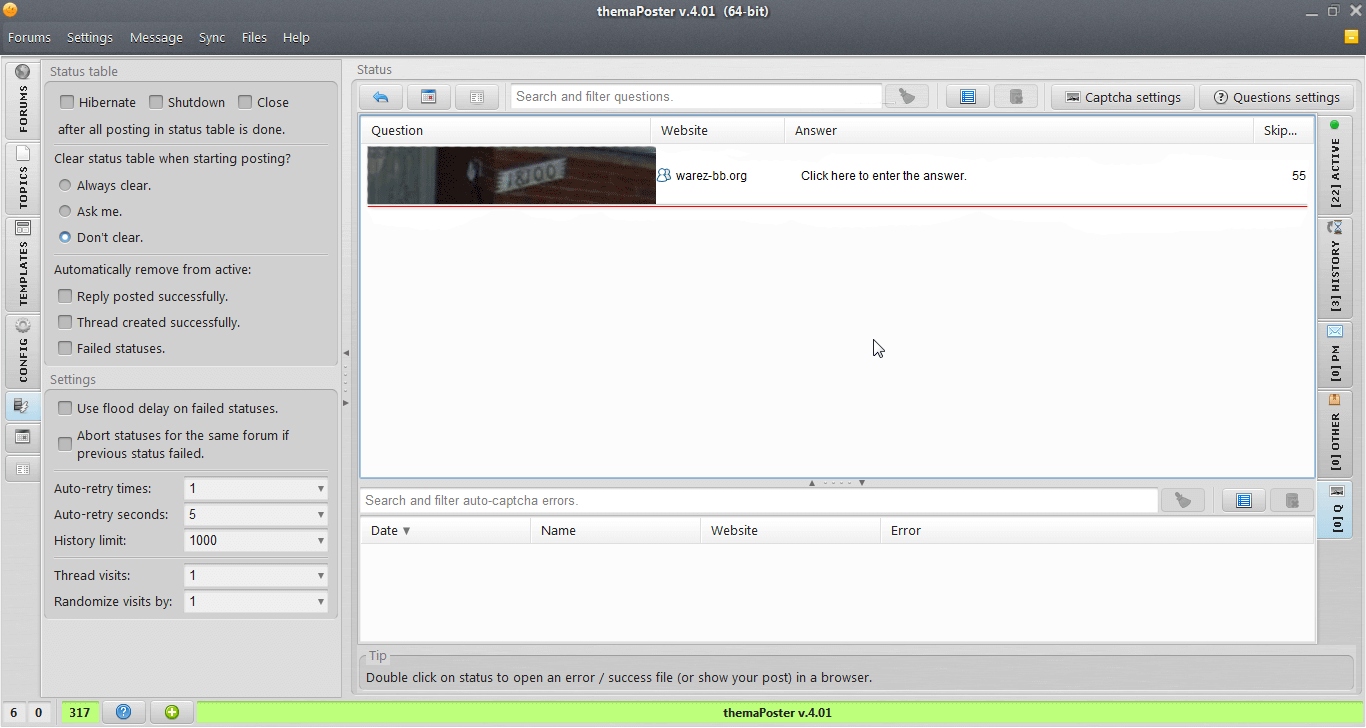
You can find basic settings in "CONFIG" tab at the left:

- Flood delay - minutes to wait between posts to the same website.
For example: let's say you have set a 2 minutes flood delay. When you try to post 10 topics to the same forum at the same time the first one will be posted immediately.
For all 9 others the timer will ticking backwards for 120 seconds + 1 second delay for each.
When those 120 seconds pass, only the first of those 9 will be sent and for all 8 others the timer will be reset to 120 seconds again.
And so on, program will only send one message to the same website.
You can set flood delay in three different places:
- in "CONFIG" tab on top left
- in "WEBSITES" -> "Other settings" tab for each website
- in "CONFIG" -> "Template's sections" / "Topic's groups" for each section / group.
The priority of flood delay is like this:
- If delay in "WEBSITES" -> "Other settings" (for specific website) is not -1, then it will be used.
- If delay in "CONFIG" -> "Template's sections" / "Topic's groups" for that section / group is not -1 then it will be used.
- Otherwise the "global" flood delay from "CONFIG" -> on top left will be used.
- Processes limit - it's basically the number of how many posts you can send at the same time. You should keep in mind that after one post is sent the process closes. If limit is reach the statuses is simply put in the queue.
- Website timeout - seconds which indicates that website was unresponsive. Usually the default value of 5 works fine.
What are the thread visits?
04.
It's the number of thread visits which are made after successful reply or created thread.
Each visit gives you a thread view. At least one view for the thread after you create it or make a reply is required (to look more like human).
You might want more views so that your topic look more popular.
Also views depends on website type. Like vBulletin adds views much later (after 1 hour maybe). phpBB should add the views after 1 minute.
Also some forums might not give the topic URL after successful post, then it might not work.
Thread visits can be adjusted in "STATUS" tab:

You can set thread visits and randomize thread visits settings. Randomize thread visits are added to normal thread visits.
For example: thread visits = 1, randomize thread visits = 3. You can get anywhere from 1 to 4 visits. Basically 1+[0;3].
Each visit gives you a thread view. At least one view for the thread after you create it or make a reply is required (to look more like human).
You might want more views so that your topic look more popular.
Also views depends on website type. Like vBulletin adds views much later (after 1 hour maybe). phpBB should add the views after 1 minute.
Also some forums might not give the topic URL after successful post, then it might not work.
Thread visits can be adjusted in "STATUS" tab:
You can set thread visits and randomize thread visits settings. Randomize thread visits are added to normal thread visits.
For example: thread visits = 1, randomize thread visits = 3. You can get anywhere from 1 to 4 visits. Basically 1+[0;3].
Proxy when posting
05.
You can also use proxy when posting. To do that click on the "CONFIG" tab on the left, then on "Proxy" tab.

Now you just need to enter the proxy you want to use. You have to find a valid proxy yourself.
You can also use proxy only for specific website. Just setup it in "WEBSITES" tab -> select website -> "Proxy" tab.
Now you just need to enter the proxy you want to use. You have to find a valid proxy yourself.
- Enter the proxy host.
- For example: 94.159.2.218 (use any valid proxy host / ip)
- Enter the proxy port.
- For example: 8080
- Enter custom display name.
- Can be anything you want.
- (optional) Enter username and password if required.
- Press the "Add proxy" button.
- After proxy is added you can enable it by selecting wanted proxy and pressing the "Enable" button at the bottom.
- You can click on it and press the "Check proxy" button to make sure it works fine.
You can also use proxy only for specific website. Just setup it in "WEBSITES" tab -> select website -> "Proxy" tab.
Posting problems tips
06.
- Make sure you are using the latest version. The latest version now is: v.5.05.
- Always check the error file by double clicking on the row in the status table after you see the error. Maybe it's your own fault.
- "Problems with page", such as website timeout / read timeout / connection timeout is websites problems and has nothing to do with the program. Just wait until website is not on heavy load or back online if it was offline.
- If you get "Successfully posted" message, but when double clicking it shows main page or you can't find your post - you might have bad URL / Type.
- When adding a topic make sure you have topic ID (not the post ID).
- "Failed to find formhash" / "Required parameter 'name' not found" error usually means that you have a bad website type / entered a bad URL or just bad topic / forum ID.
- Also make sure that URL has "/forum" or "/forums" or something like that at the end if forum is not at main domain.
- Can't find forum or topic ID and templates finder can't find it also? Check: open forum topic.
Cloudflare related issues and solutions
07.
Experiencing higher CPU load when trying to bypass Cloudflare?
Reduce (set lower) "Security processing threads" option in general settings. Recommended 1 or 2.
Make sure that you don't see a red lock icon near your username:

If you see this it means smart-login is not being used and it needs to bypass Cloudflare each post (makes posting slower).
Go to "WEBSITES" -> select needed site -> "Other settings" -> uncheck options "Disable smart login" and "Disable auto-retry" -> press "Update" button.

Both of those options must not be enabled to use smart-login.
Reduce (set lower) "Security processing threads" option in general settings. Recommended 1 or 2.
Make sure that you don't see a red lock icon near your username:
If you see this it means smart-login is not being used and it needs to bypass Cloudflare each post (makes posting slower).
Go to "WEBSITES" -> select needed site -> "Other settings" -> uncheck options "Disable smart login" and "Disable auto-retry" -> press "Update" button.
Both of those options must not be enabled to use smart-login.
6. Posts list and schedule
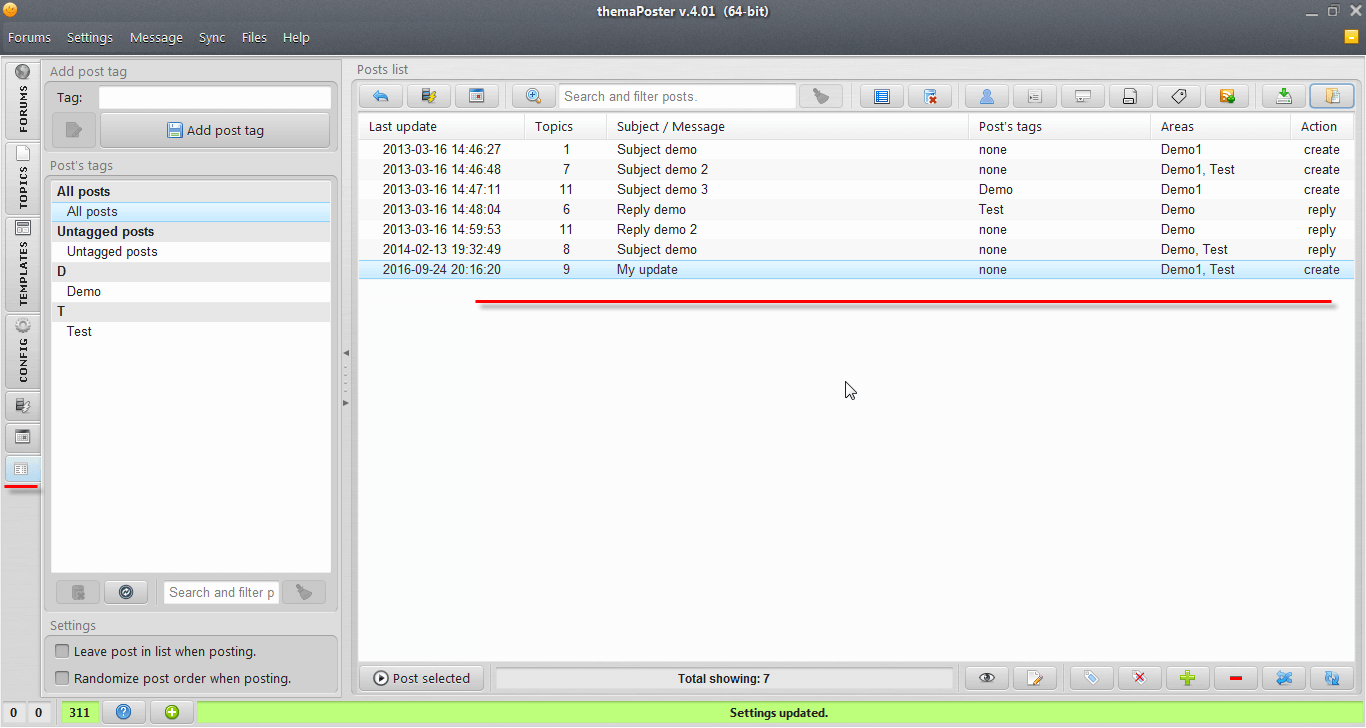
Add messages to posts list (the interface way)
01.
Posts list can be used for saving your messages (and posting later) or schedule interval posting which is described in 6.4 chapter.
There are few ways to add messages to posts list. First one is the interface way.
You can do this from "TOPICS" or "TEMPLATES" tab depending if you want to reply to topics or to create new threads later.
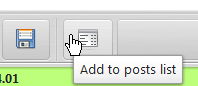
There are few ways to add messages to posts list. First one is the interface way.
You can do this from "TOPICS" or "TEMPLATES" tab depending if you want to reply to topics or to create new threads later.
- Select "TOPICS" or "TEMPLATES" tab.
- Select wanted group(s) or section(s).
- If needed select wanted topics or templates (by default selects all).
- Enter your subject. If needed enter description, tags, choose prefix and/ or user rank, enable subscribe.
- Enter your message text.
- Press on "Add to posts list" button at the bottom.
Add messages to posts list (the .txt files way)
02.
Posts list can be used for saving your messages (and posting later) or schedule interval posting which is described in 6.4 chapter.
There are two ways to add messages to posts list with the .txt files way.
First way is from "posts list" tab:

The second way to add posts from .txt files to posts list is to use "auto-posting from directory".
You will need to change settings in "CONFIG" -> "Directory posting":

Choose the option to "Add posts to posts list and not send them immediately".
After that follow the instructions in chapter 4.7 (auto-create from directory) or 3.4 (auto-reply from directory).
Just keep in mind that it won't post it immediately, but instead it will be loaded to posts list.
There are two ways to add messages to posts list with the .txt files way.
First way is from "posts list" tab:
- Go to "posts list" tab on the left.
- Press on "Load from .txt to posts list" button.
- After that navigate to needed folder and select your .txt file(s):

- Choose action "reply" (reply to topics) or "create" (create new threads):

- Then you will need to choose group or section.
- Finally select the needed topics or templates.
The second way to add posts from .txt files to posts list is to use "auto-posting from directory".
You will need to change settings in "CONFIG" -> "Directory posting":
Choose the option to "Add posts to posts list and not send them immediately".
After that follow the instructions in chapter 4.7 (auto-create from directory) or 3.4 (auto-reply from directory).
Just keep in mind that it won't post it immediately, but instead it will be loaded to posts list.
Schedule your posts. Automatic posting at any chosen time
03.
Tip: you can use keyboard shortcuts for faster work.
ALT + W - enable / disable schedule.
ALT + Q - choose time.
Watch in HD and full-screen for better view.
ALT + W - enable / disable schedule.
ALT + Q - choose time.
Watch in HD and full-screen for better view.
Schedule interval posting from posts list
04.
Interval posting is used to schedule posting with each post separated by specific time amount (which can be a bit randomized).
Interval posting is done from posts list:
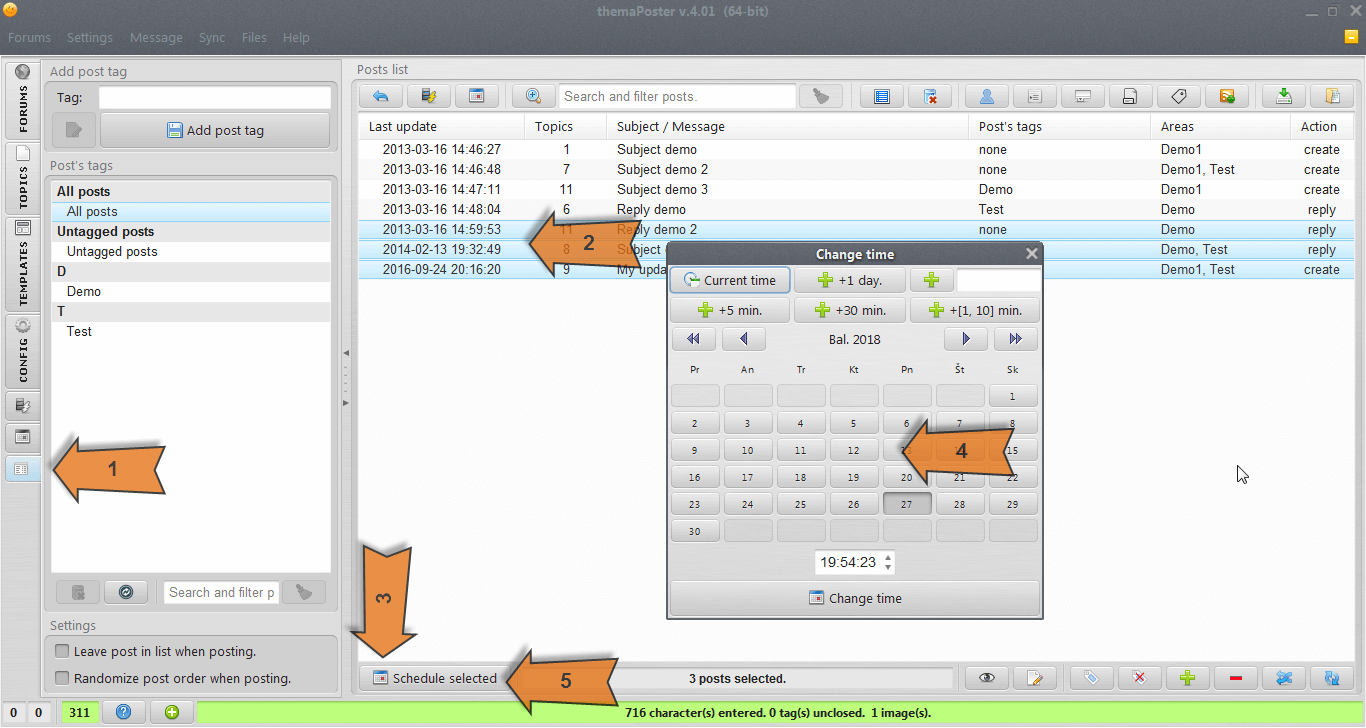
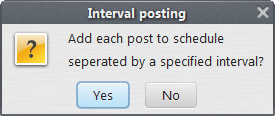
After this you should see a dialog to choose interval time:
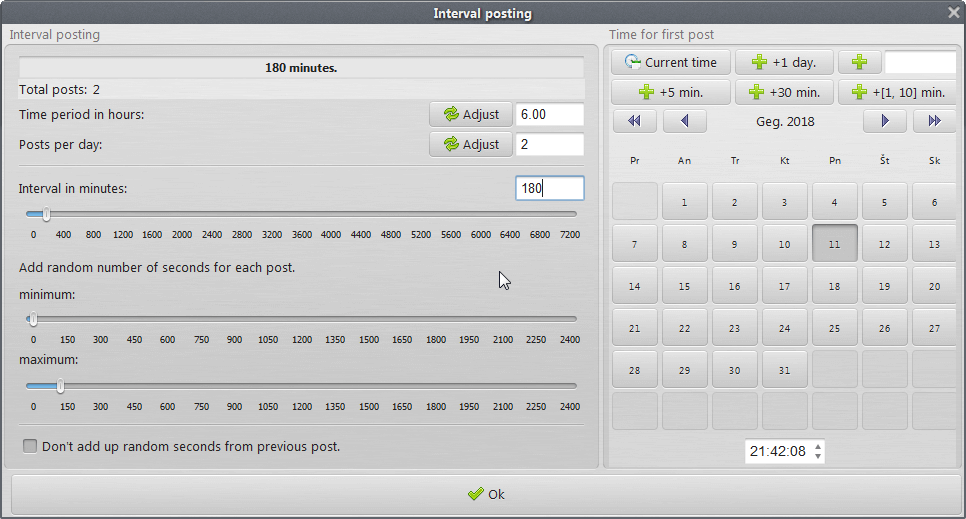
Interval time is in minutes. The default is 180 minutes (3 hours) and it will add a small amount of random seconds between [0; 120]. You can change these times based on your needs.
For example: you had selected 3 posts and chosen the time for post earlier to be 2014-02-28 17:00:00
Interval time is 180 minutes (3 hours).
That means the first post will be made on 2014-02-28 17:00:00, the second post on 2014-02-28 20:00:00 (+random seconds) and the third on 2014-02-28 23:00:00 (+random seconds)
Interval posting is done from posts list:
- Go to "posts list" tab.
- Select all wanted posts (must be more than 1).
- You can filter first by post tags if needed.
- Enable schedule.
- You can use shortcut ALT+W or enable it from "schedule" tab.
- The button at the bottom should have a small calendar icon and the button text changed to "Schedule selected" (original is "Post selected").
- Choose time.
- You can use shortcut ALT+Q or from "schedule" to open the "Choose time" window.
- The time you choose is for first post only.
- Press on "Schedule selected" button.
- You might want to enable "leave post in list when posting", this setting will not remove the posts from posts list.
After this you should see a dialog to choose interval time:
Interval time is in minutes. The default is 180 minutes (3 hours) and it will add a small amount of random seconds between [0; 120]. You can change these times based on your needs.
For example: you had selected 3 posts and chosen the time for post earlier to be 2014-02-28 17:00:00
Interval time is 180 minutes (3 hours).
That means the first post will be made on 2014-02-28 17:00:00, the second post on 2014-02-28 20:00:00 (+random seconds) and the third on 2014-02-28 23:00:00 (+random seconds)
Tips on filtering and sorting posts in posts list
05.
Click on image to view full size.
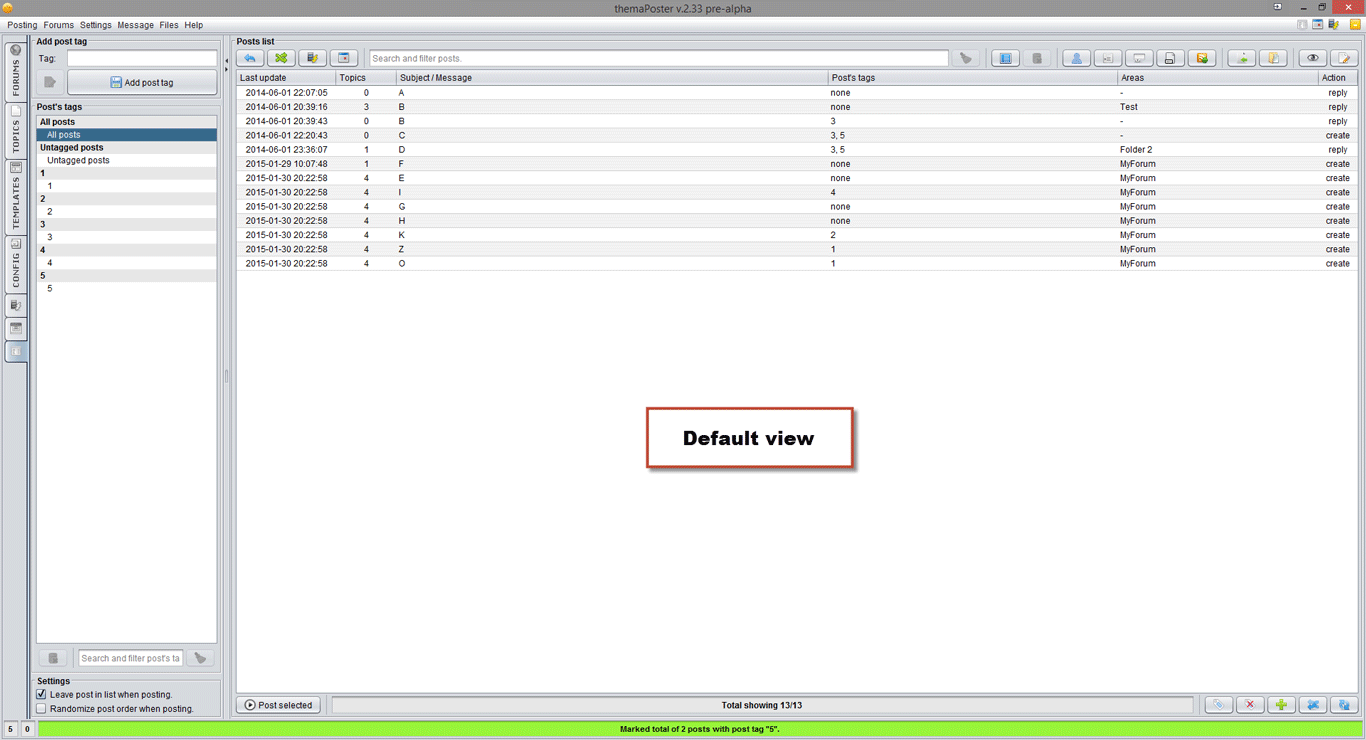
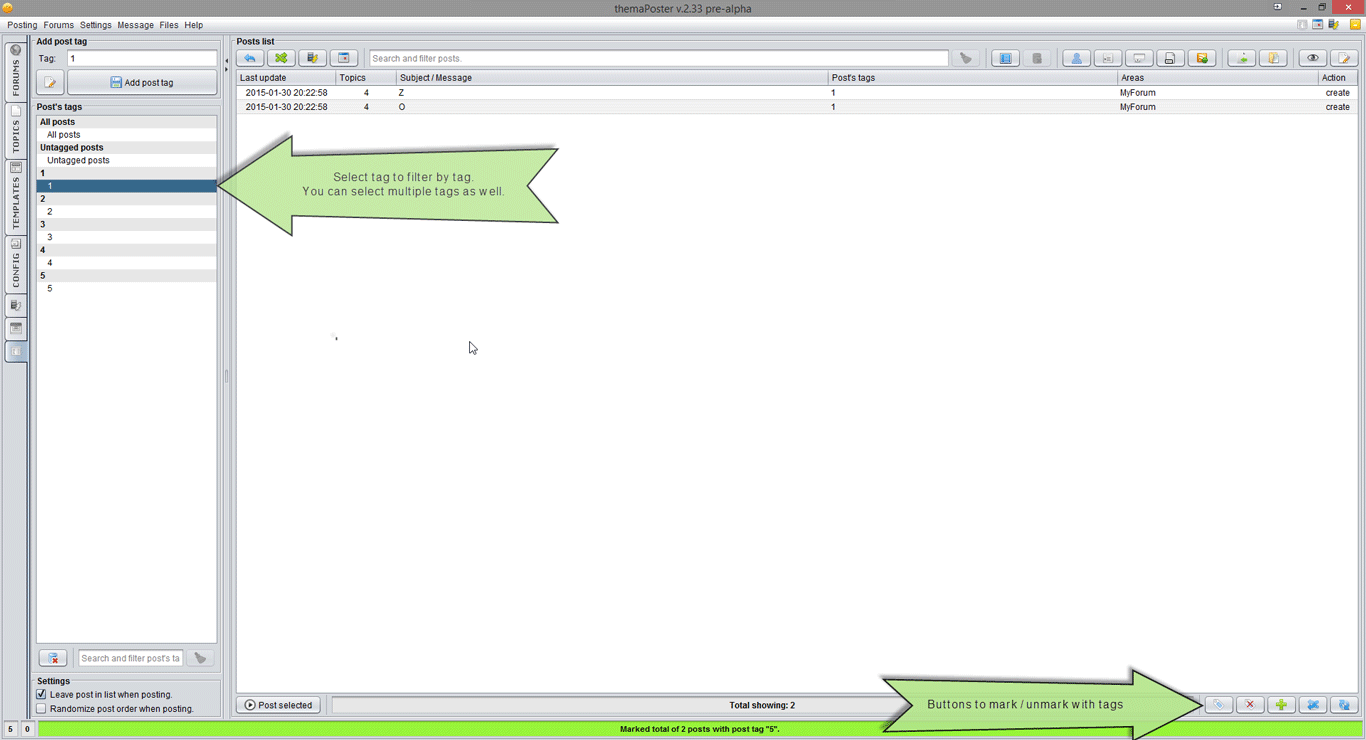

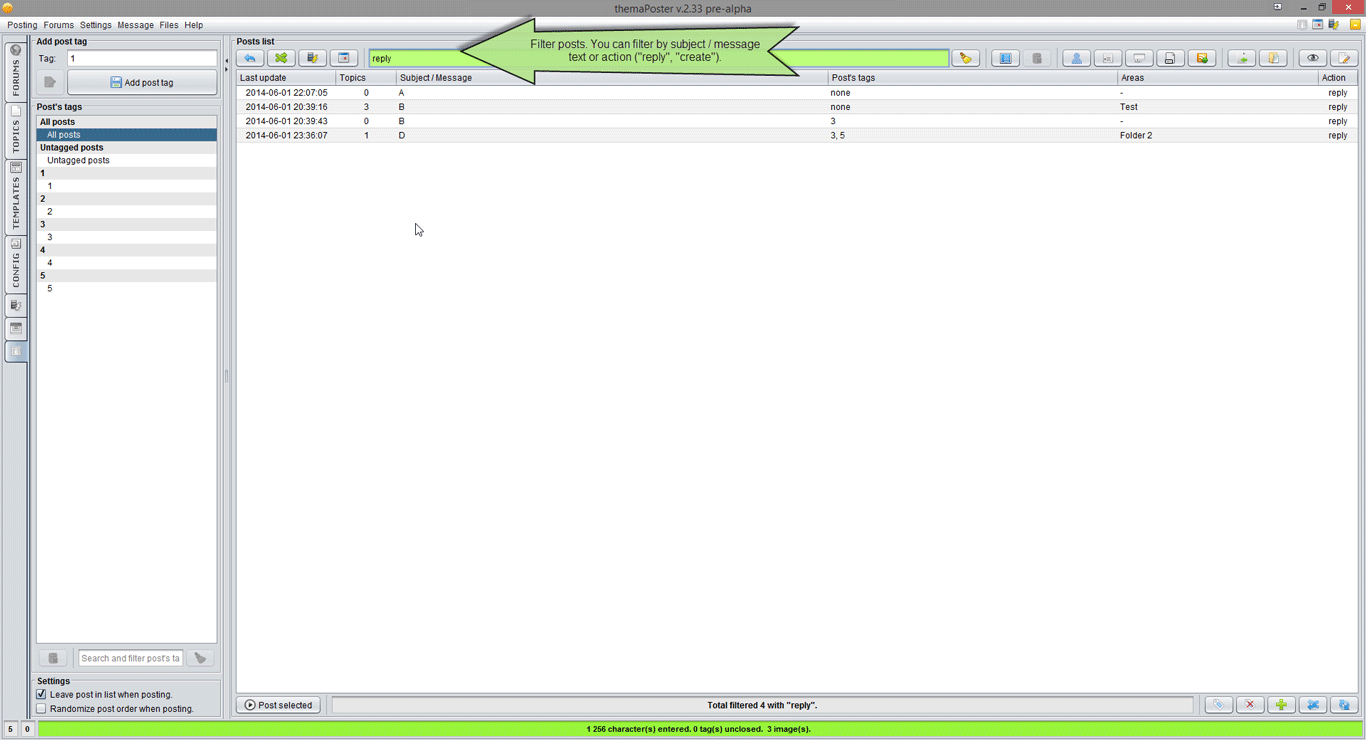

- Posts lists has one hidden column by default "user rank". Right click on any column in posts list table to make it visible if needed.